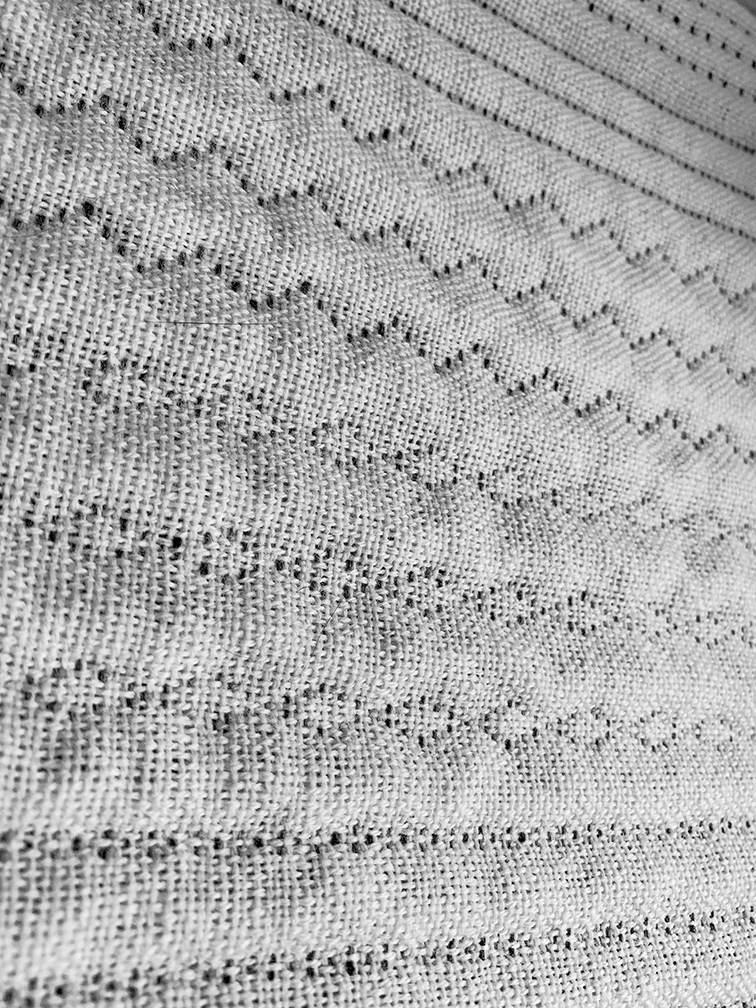
A pique weave is essentially a weft wise cord. It is characterised by raised, wadded areas across the width of the cloth. A face cloth is woven, usually using a plain weave but doesn’t have to be, which is then padded to create a raised surface. At regular intervals stitcher threads, from a separate warp which has remained hidden behind the cloth, are woven in to the face cloth to create an indentation. In the example above the white ends are the plain woven face cloth and the black threads are the stitcher ends.
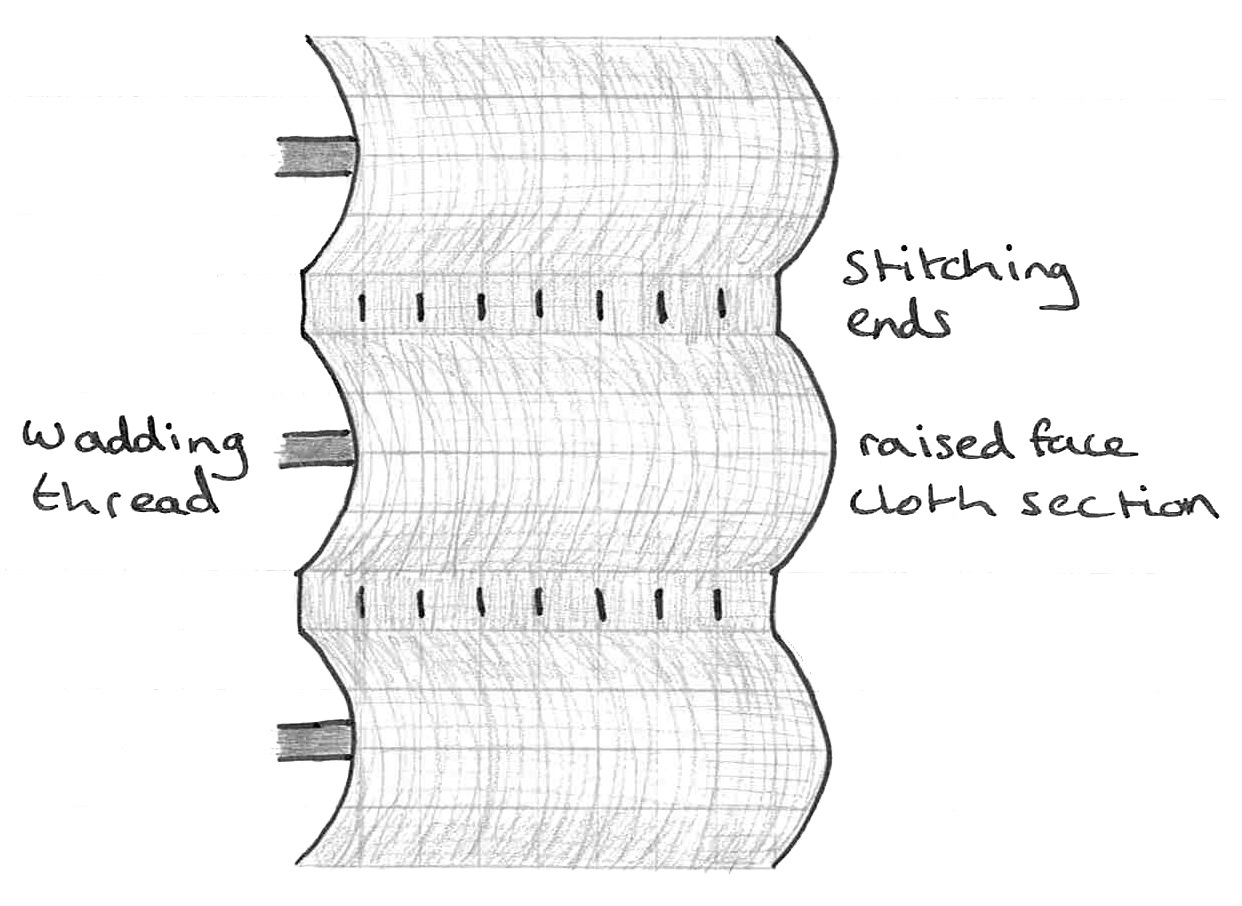
Two warps are used, one for the face of the cloth and on for the stitcher ends. These are usually at a ratio of one stitcher end for every two face ends. These stitcher ends are used to separate the raised wadded areas and are hidden behind the face cloth when not needed. A wadding thread, usually a thick yarn, is inserted in the middle of each section of face cloth to create a raised surface. The stitching ends are brought up at the end of each section and woven in to the face cloth for one or more picks. This secures the face cloth down and creates an indentation across the width of the fabric between weaving each section of face cloth.
The face and stitcher ends need to be on separate beams to allow the face ends to be woven at a lesser tension so that they are able to raise over the wadding creating height.
A non slippery yarn is best to avoid the weft slipping along the warp. A Pique can be woven as a loose backed cloth or fast backed cloth. This means that the stitching ends are either floating on the back of the cloth (loose backed) or woven into the wadding on the back of the cloth (fast backed). A loose backed cloth is fine when the back is not going to show. For practicality the back may need to be woven to stop it from catching. There are multiple ways to vary your Pique:
The raised, wadded areas can be narrow, wide or a combination of both. However if they are too wide definition may be lost and if they are too narrow they may not show up well.
The stitching threads could simply be brought up for one pick or for several in a more decorative pattern.
The wadding can also be varied. A small amount of wadding can produce something subtle or something thicker will produce a more dramatic effect.
Below are some example drafts.
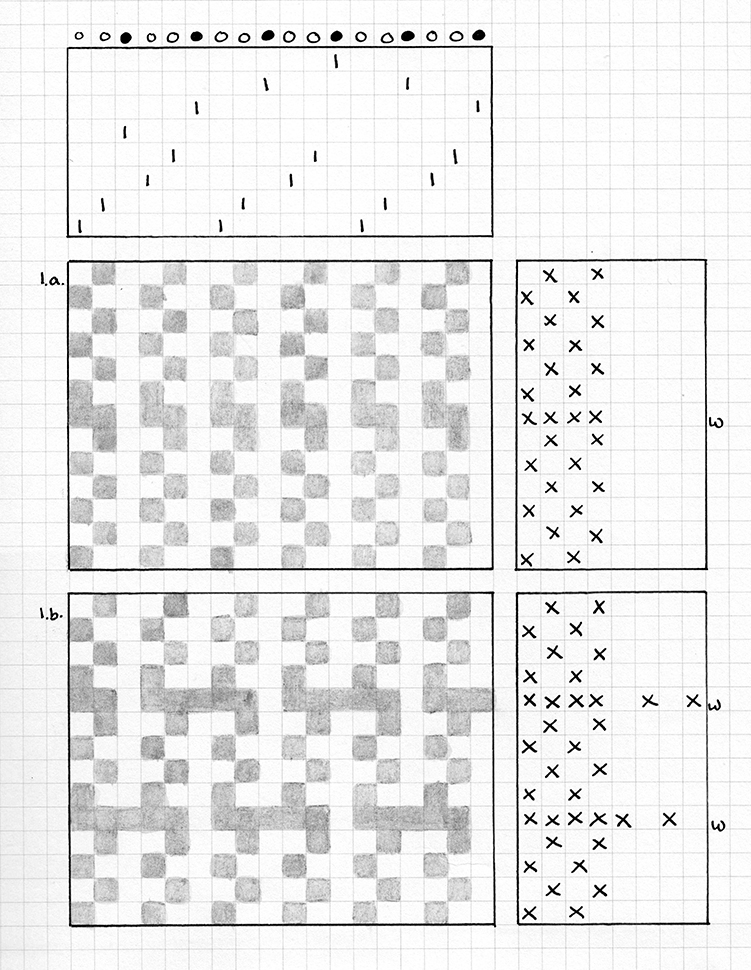
This draft below shows how the raised area could be woven as either a loose backed pique (1.a.) or a fast backed pique (1.b.). The stitcher ends would be woven in before and after each section.
The face ends (white) are on shafts 1 – 4 and the stitcher ends (black) are on shafts 5 – 8. In the loose backed cloth the stitcher ends are left to float behind the face of the cloth which is being woven as plain weave. In the fast backed cloth the sticher ends are woven as plain weave in to the wadding thread(s).
The wadding thread(s) are inserted in each pick where all of the face ends are raised.
The number of plain weave picks can be varied to make the wadded areas wider or narrower. The amount of wadding can also be increased or decreased to vary the prominence on the raised areas.
This draft below shows two examples of how the stitcher ends can be woven. They are called stitcher ends because they act like stitches holding the farbic down between each of the raised areas. in the first example the stitcher ends would be raised for two picks between the wadded areas before lowering behind the face cloth again. I find that if the stitcher ends are raised for only one pick then they get lost and don’t show up. In the second example the stitcher ends are raised multiple times between the wadded areas in a diamond pattern. These ends can be raised and lowered as many times as desired to create different effects.
These stitcher drafts would be inserted before and after one of the face weaves above. For example you might choose the loose backed face cloth weave above and alternate it with the first of the stitcher drafts below.
Extra warp, also known as supplementary warp, is where additional warp ends are inserted and used to create a decorative pattern on top of the ground cloth.
The ground cloth is usually kept simple, such as a plain or twill weave, to enhance the extra warp. This extra warp is woven on separate shafts to the ground cloth so that it can be woven independently to create the decorative pattern without interrupting the ground cloth weave.
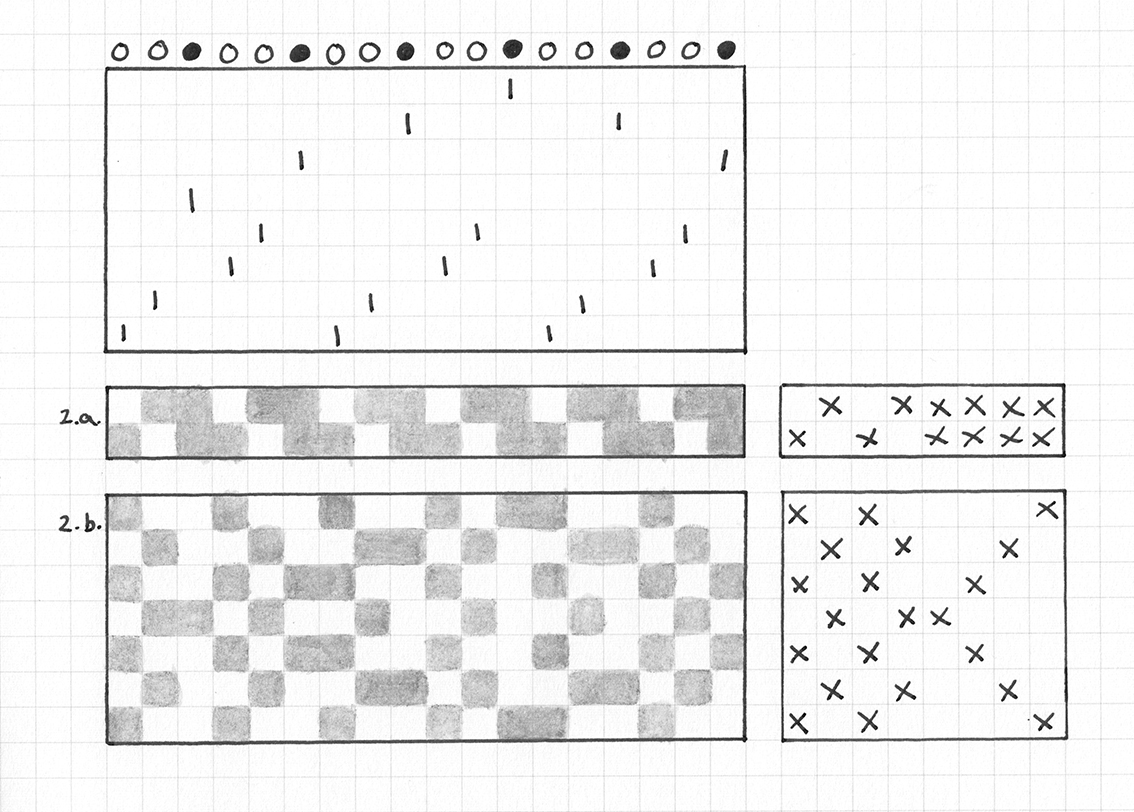
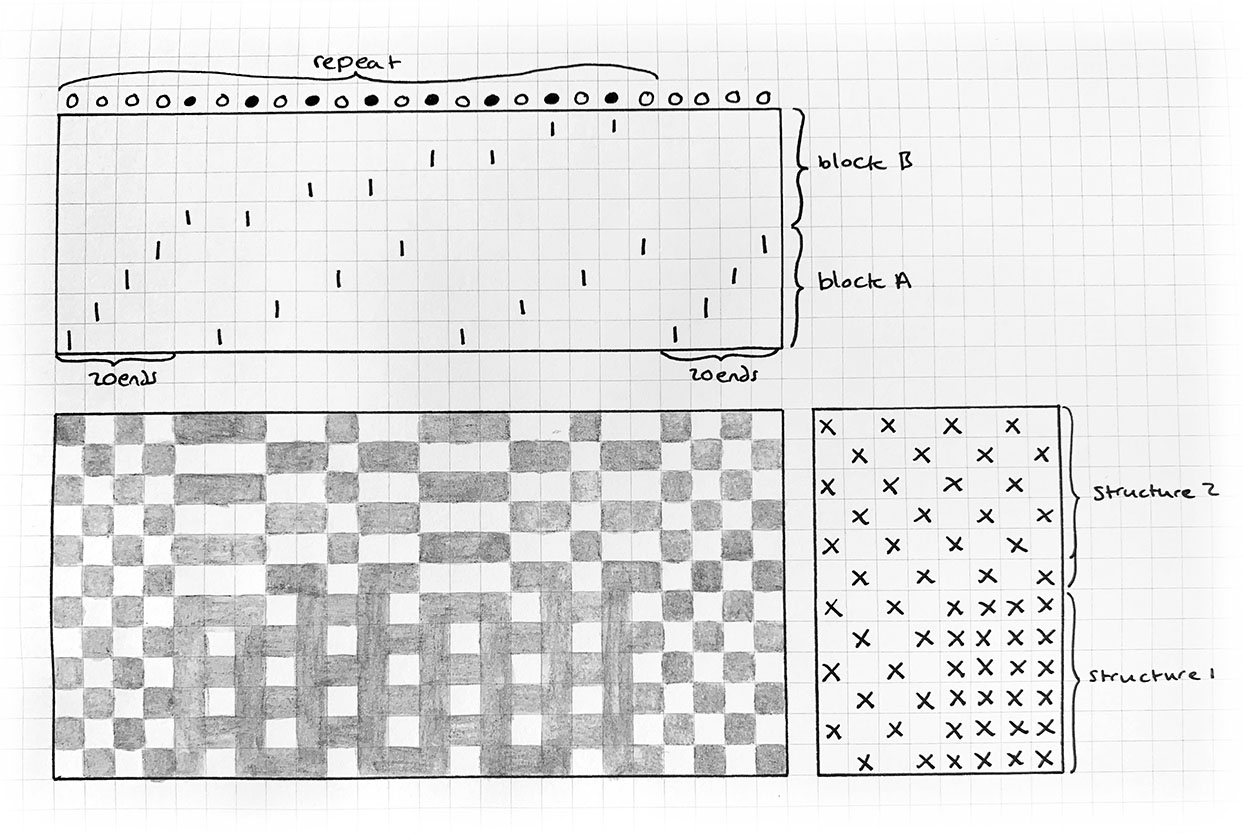
The example below shows an extra warp design using 8 shafts. Shafts 1-4 are for the ground cloth while the extra warp is on shafts 5-8. The black extra warp ends are inserted at regular intervals along the width of the warp.
The extra warp ends have been alternated with the ground cloth ends so that they do not interfere with the ground cloth weave. If the extra warp ends were all put in next to each other the ground cloth may end up having gaps.
The white ground cloth ends are put through the reed at a rate of 30 ends per inch. The extra warp threads are put in as additional threads so the warp is actually threaded at a higher density at these point. This is so the ground cloth remains consistent throughout. It needs to be able to weave a plain weave when the extra warp ends are not being woven in.
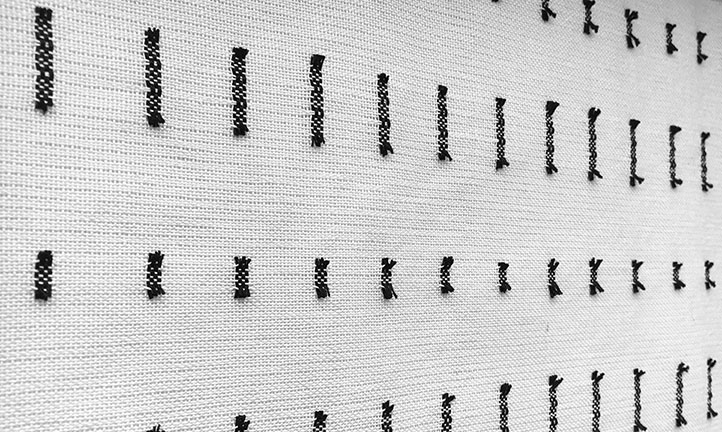
As you can see there are two woven structures above. In structure 1 the extra warp threads are floating over the surface of the cloth whereas in structure 2 the threads are woven in to the cloth. I have decided to cut the floating threads away. This will leave the black extra warp ends where they have been woven into the ground cloth creating rectangles. Structure 2 can be woven for fewer picks to create small squares or more picks to create longer rectangles.
Once you have decided on a project you may want to work out how much yarn you are going to need. This may be so you can buy or dye the correct amount without vastly over or under estimating.
The following will take you through the calculation to work out how much weft yarn will be needed. It looks like a lot but they should be relatively straight forward things to work out. For the sake of simplicity I will work in centimetres/meters but the same can be applied to inches/yards.
The calculaion is as follows:
Total number of picks x total width of fabric (m) = amount of yarn needed (m)
How to work out the total number of picks
PPC (picks per cm) x (length of woven piece (cm) + shrinkage/take-up (cm)) = Total number of picks
The picks per cm is usually determined by sampling but if it has no been woven before see CALCULATING A SETT and use the same as the epc.
The shrinkage/take-up is usually assumed to be 10% of the width of the woven piece but this can vary by a large amount depending on the yarn, structure and finishing. Sampling will give you a more accurate number.
How to work out the total width of the warp
width of woven piece (m)+ shrinkage/take-up (m) = Total widthof warp (m)
The shrinkage/take-up is usually assumed to be 10% of the width of the woven piece but this can vary by a large amount depending on the yarn, structure and finishing. Sampling will give you a more accurate number.
It is often easier to work out the calculations in cm and then convert to m by dividing by 100 at the end.
Leno is a weave structure where two or more warp threads twist around the weft threads. This technique is often used to create strong, fine fabric which is stable. The twisted warp yarns ensure the yarn does not move. It is also useful to use this at the edge of a gap in the warp otherwise the warp ends have a tendency to want to fill the space.
Setting up a loom for doup leno is time consuming but once it is set up it’s fairly quick to weave.
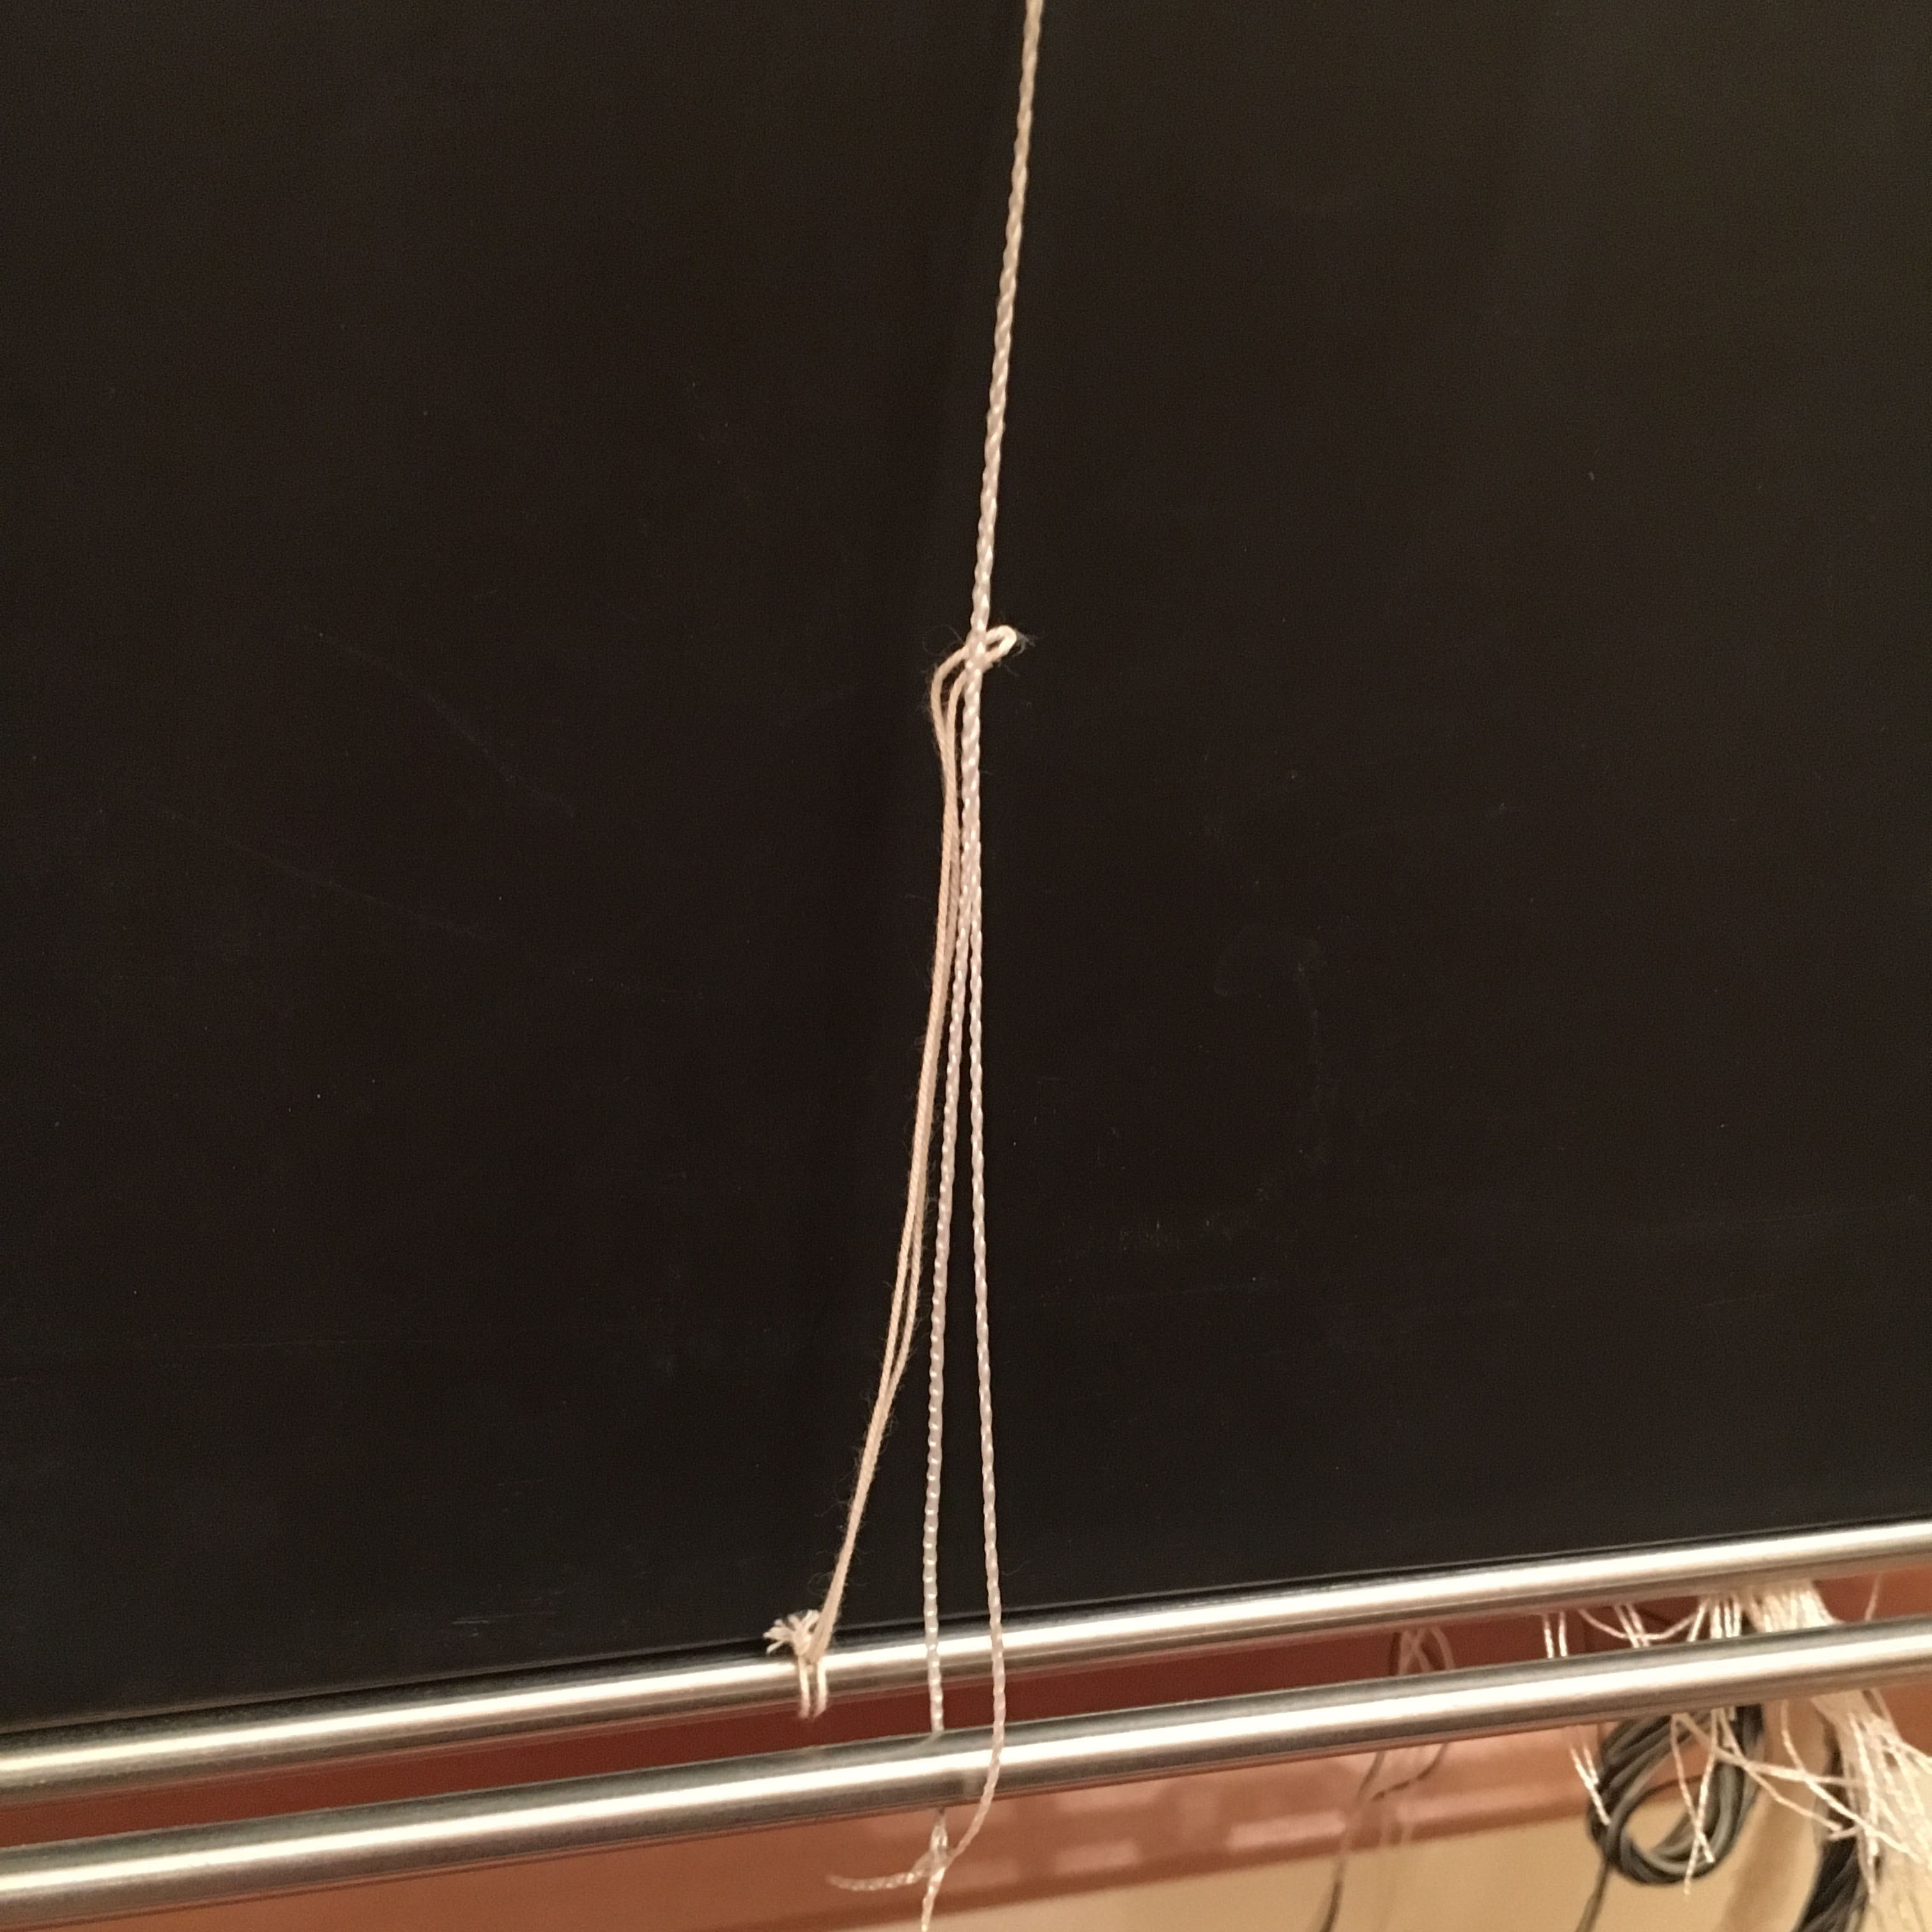
To create this structure a loop of thread (a doup) is attached to an empty shaft and travels through an empty heddle on an adjacent shaft. The doup warp end is then threaded through the doup to pull it under an adjacent warp end creating a twist. A weft pick holds the twist in place.
Below shows a doup attached to shaft 2 and poking through an empty heddle on shaft 1. Two shafts are needed to create the twist and two are needed for the twisting warp ends. This is in addition to any shafts needed if other structures are to be included in the fabric. It is important that the doup is not too long and only just reaches through the heddle as this would result in a poor shed. The warp end to be twisted will be threaded through this loop rather than a heddle.
A strong smooth thread works best for the doups. A doup will be needed for every twist required. It’s a good idea to make the doups by tying them around something such as two nails in a piece of wood spaced the required distance apart. They need to all be consistent in length to ensure an even shed.
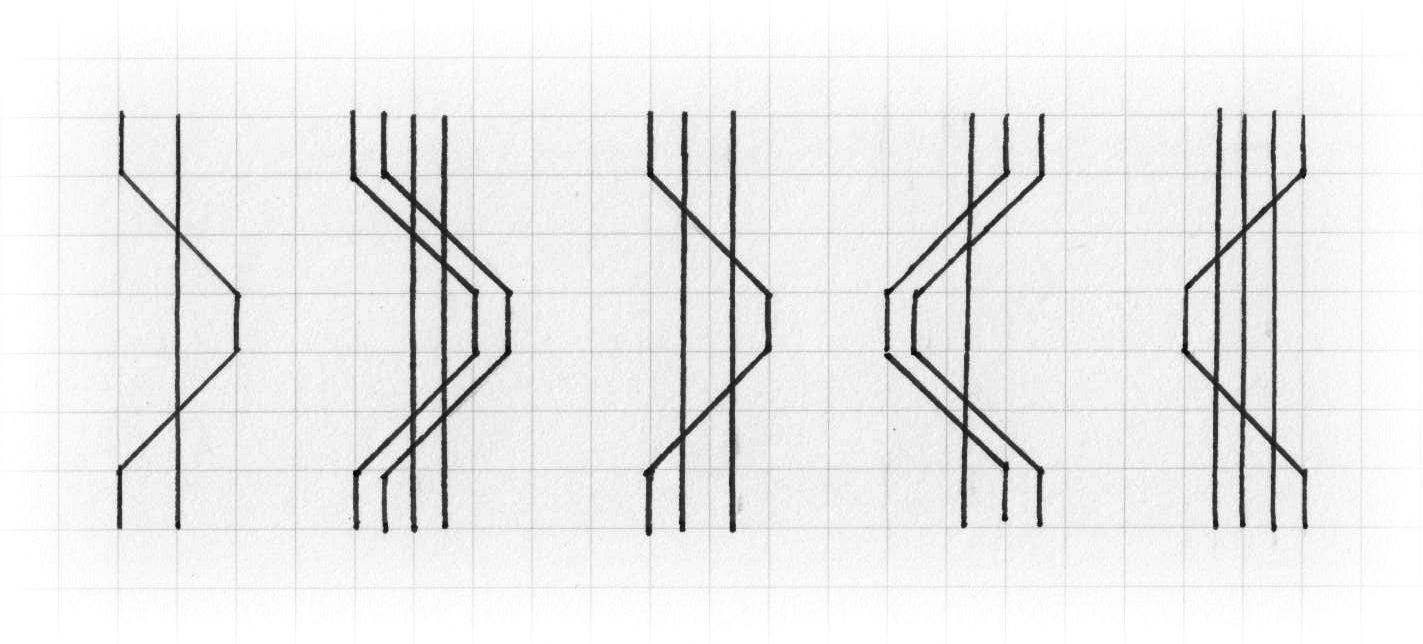
The direction of the twist can be changed and the number of warp ends which twist around each other can be varied. The following shows a selection of options:
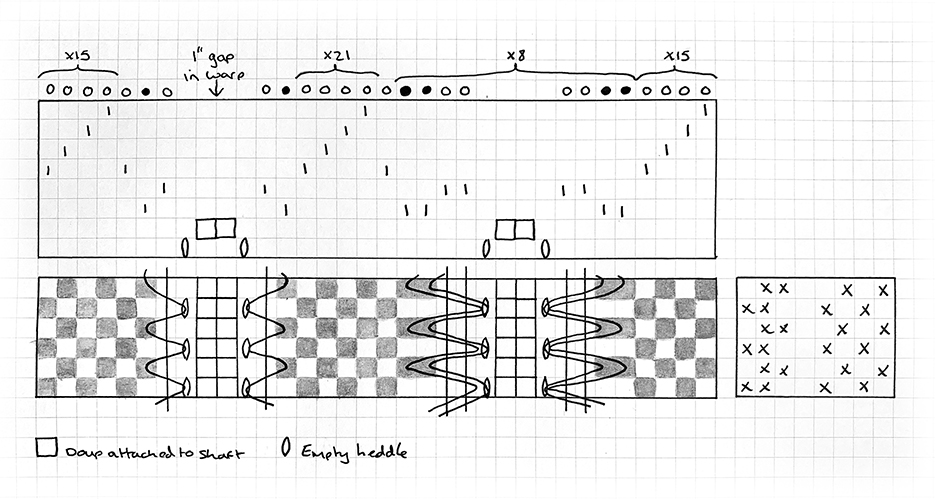
Here is a draft for a weave using doup leno and plain weave structures:
It is important to remember that all the twisting threads (leno ends and warp ends) must be put through the same dent in the reed.
To make it easy to see which warp ends will be twisting these threads are black. All the other threads are white. 8 shafts are used:
Shaft 1 will contain the empty heddle for each doup to be threaded through and will be lifted every time the warp thread is to be twisted. Shaft 2 is where the doups will be attached .This shaft will need to be kept raised throughout the whole weaving process otherwise the leno warp end may be broken. Shaft 3 is for the black leno ends which are the ones to be twisted. This will be lowered when shaft 1 is lifted to create the threads. Shaft 4 is for the warp end that the black end will twist around and remains stationary (lowered) throughout the weaving process. Shafts 5-8 are used for the plain weave of the rest of the fabric.
In the draft above there are two sections of Leno on a plain weave fabric. One on the left where just two leno threads are used to stop the warp moving in to a gap in the warp. The second on the right is an area of leno in which two leno ends twist around two warp ends.
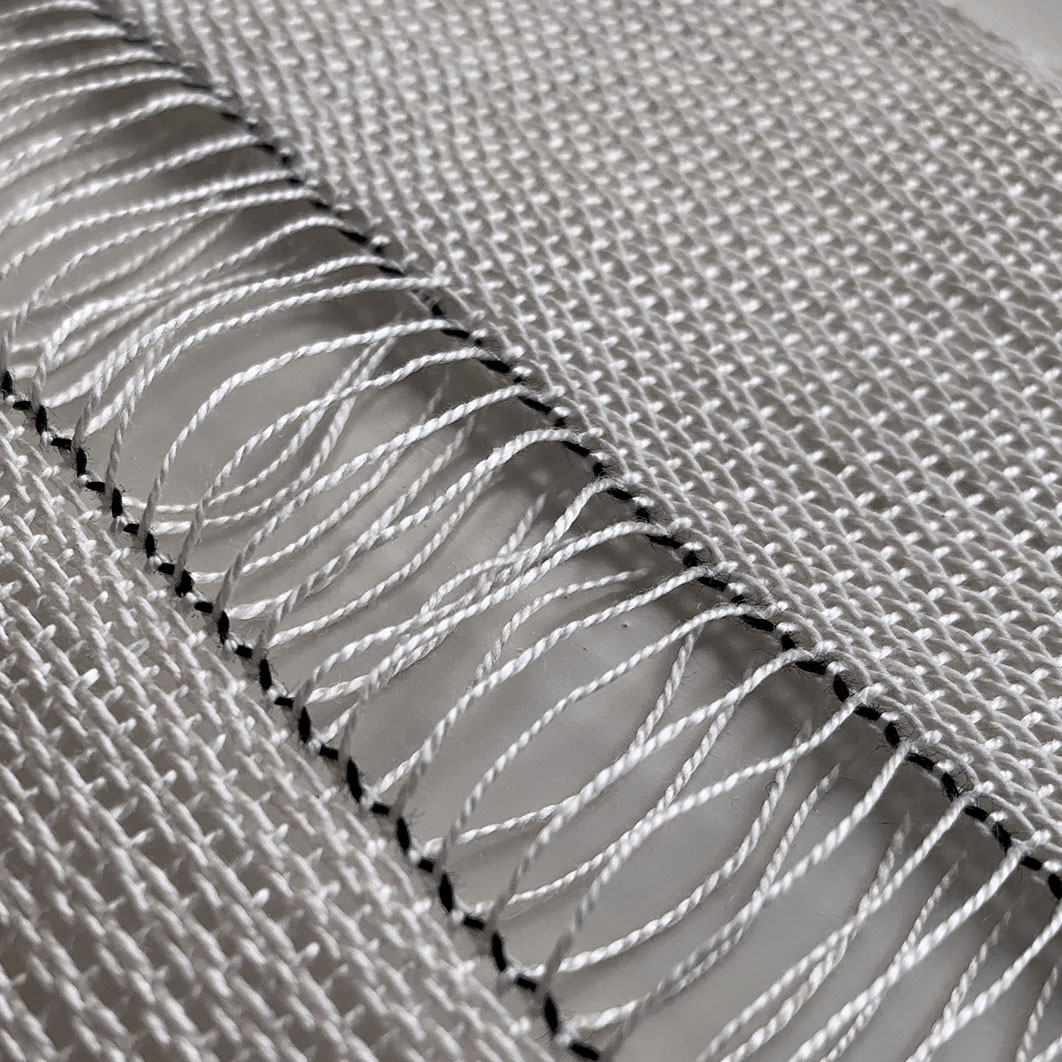
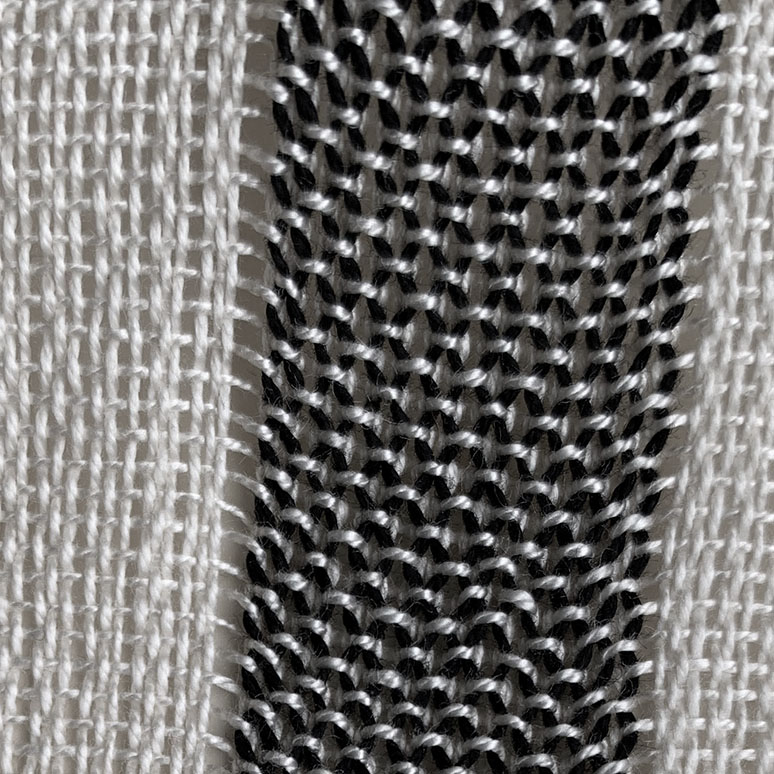
Below are close ups of the two different leno weaves from the above draft as well as a diagram for each to show how the dark leno ends are twisitng.
In an extra weft structure one weft yarn is used to weave a ground cloth and an additional weft is inserted at intervals to create a decorative pattern on the surface on the cloth.
The ground cloth is usually woven with a simple structure such as a plain or twill weave to enhance the extra weft but other structures can be used.
The sections of the warp that will interact with the extra warp to create the pattern are set up on separate shafts to allow it to be woven independently from the ground cloth where required. The number of shafts needed depends on how complicated the pattern is going to be.
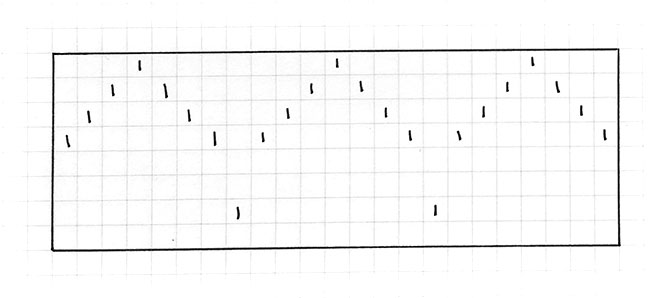
For the example below I have used an eight shaft loom. Plain weave is woven across all 8 shafts for the ground cloth (block A and B woven simultaneously). Shafts 5-8 (block B) are only threaded in specific areas and are woven independently to create diamonds at regular intervals throughout the cloth.
The first end in block A after a block of B must be threaded on shaft two otherwise a plain weave structure will not be possible. The best way to spot these potential errors before weaving is to draw out the draft either by hand or on a weave program.
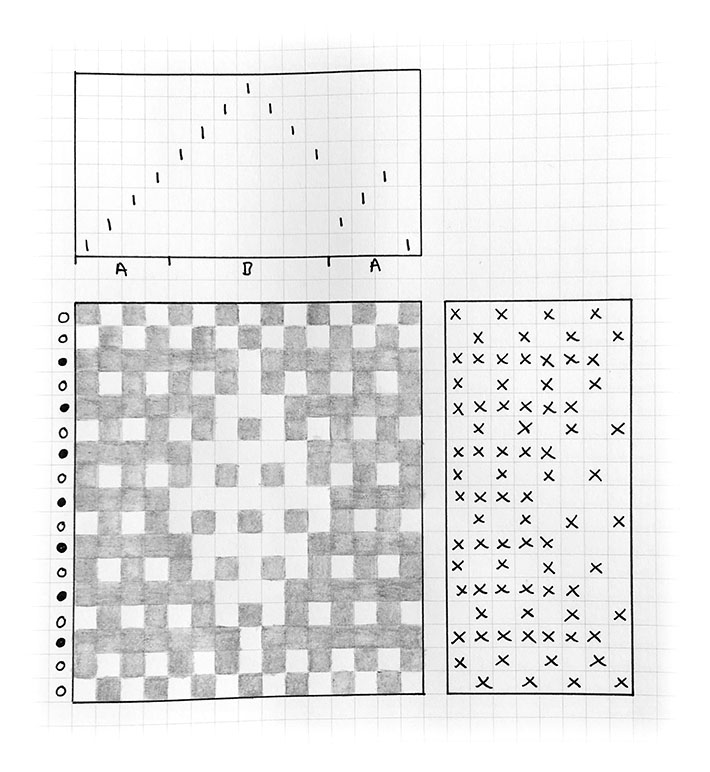
Below is the weave draft showing how a diamond structure can be achieved using an extra weft structure:
To ensure a stable structure around the extra weft diamond, the ground cloth picks are alternated with the extra weft picks. On the left of the draft the filled circles represent the extra weft and the empty one the weft represent the ground cloth.
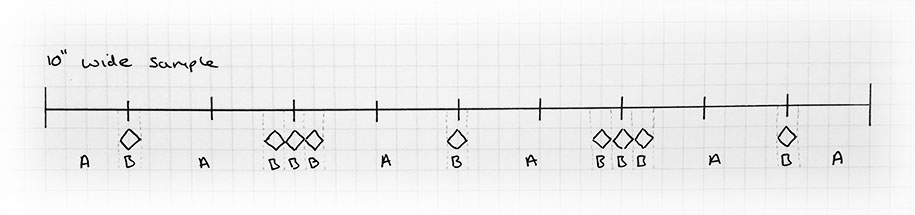
This is how the blocks will be spread throughout the woven sample:
Where there are three diamonds placed right next to each other I have placed one warp end separating them, threaded on shaft two. If they were not separated by this thread there would be one weft pick floating over the middle of all three diamonds. Threading plan for the three diamonds next to each other:
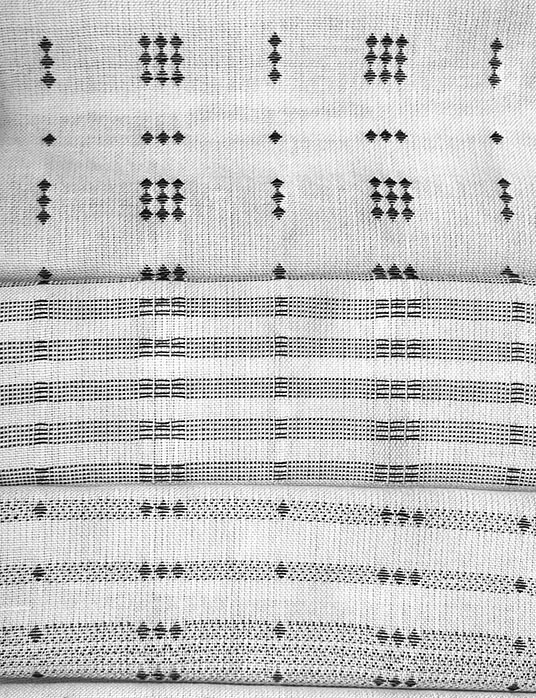
The woven samples below are all woven with the same warp set up. Included is the diamond structure explained above.
Extra weft structures can be used in many different ways to create a vast range of cloths.
Once you have decided on a project you may want to work out how much yarn you are going to need. This may be so you can buy or dye the correct amount without vastly over or under estimating.
The following will take you through the calculation to do this. It looks like a lot but they should be relatively straight forward things to work out. For the sake of simplicity I will work in centimetres/meters but the same can be applied to inches/yards.
The calculaion is as follows:
Total number of ends x total length of warp (m) = amount of yarn needed (m)
How to work out the total number of ends
EPC (see calculating sett) x (width of woven piece (cm) + shrinkage/take-up (cm)) = Total number of ends
The shrinkage/take-up is usually assumed to be 10% of the width of the woven piece but this can vary by a large amount depending on the yarn, structure and finishing. Sampling will give you a more accurate number.
How to work out the total length of the warp
Length of woven piece(s) (m)+ shrinkage/take-up (m) + yarn wastage (m) = Total length of warp (m)
If weaving more than one piece add the lengths together
The shrinkage/take-up is usually assumed to be 10% of the length of the woven piece but this can vary by a large amount depending on the yarn, structure and finishing. Sampling will give you a more accurate number.
Yarn wastage is the amount of yarn used to tie on to the front beam plus the warp woven for even end distribution plus the loom waste (the amount of yarn left on the loom not able to be woven).
It is often easier to work out the calculations in cm and then convert to m by dividing by 100 at the end.