Leno is a weave structure where two or more warp threads twist around the weft threads. This technique is often used to create strong, fine fabric which is stable. The twisted warp yarns ensure the yarn does not move. It is also useful to use this at the edge of a gap in the warp otherwise the warp ends have a tendency to want to fill the space.
Setting up a loom for doup leno is time consuming but once it is set up it’s fairly quick to weave.
To create this structure a loop of thread (a doup) is attached to an empty shaft and travels through an empty heddle on an adjacent shaft. The doup warp end is then threaded through the doup to pull it under an adjacent warp end creating a twist. A weft pick holds the twist in place.
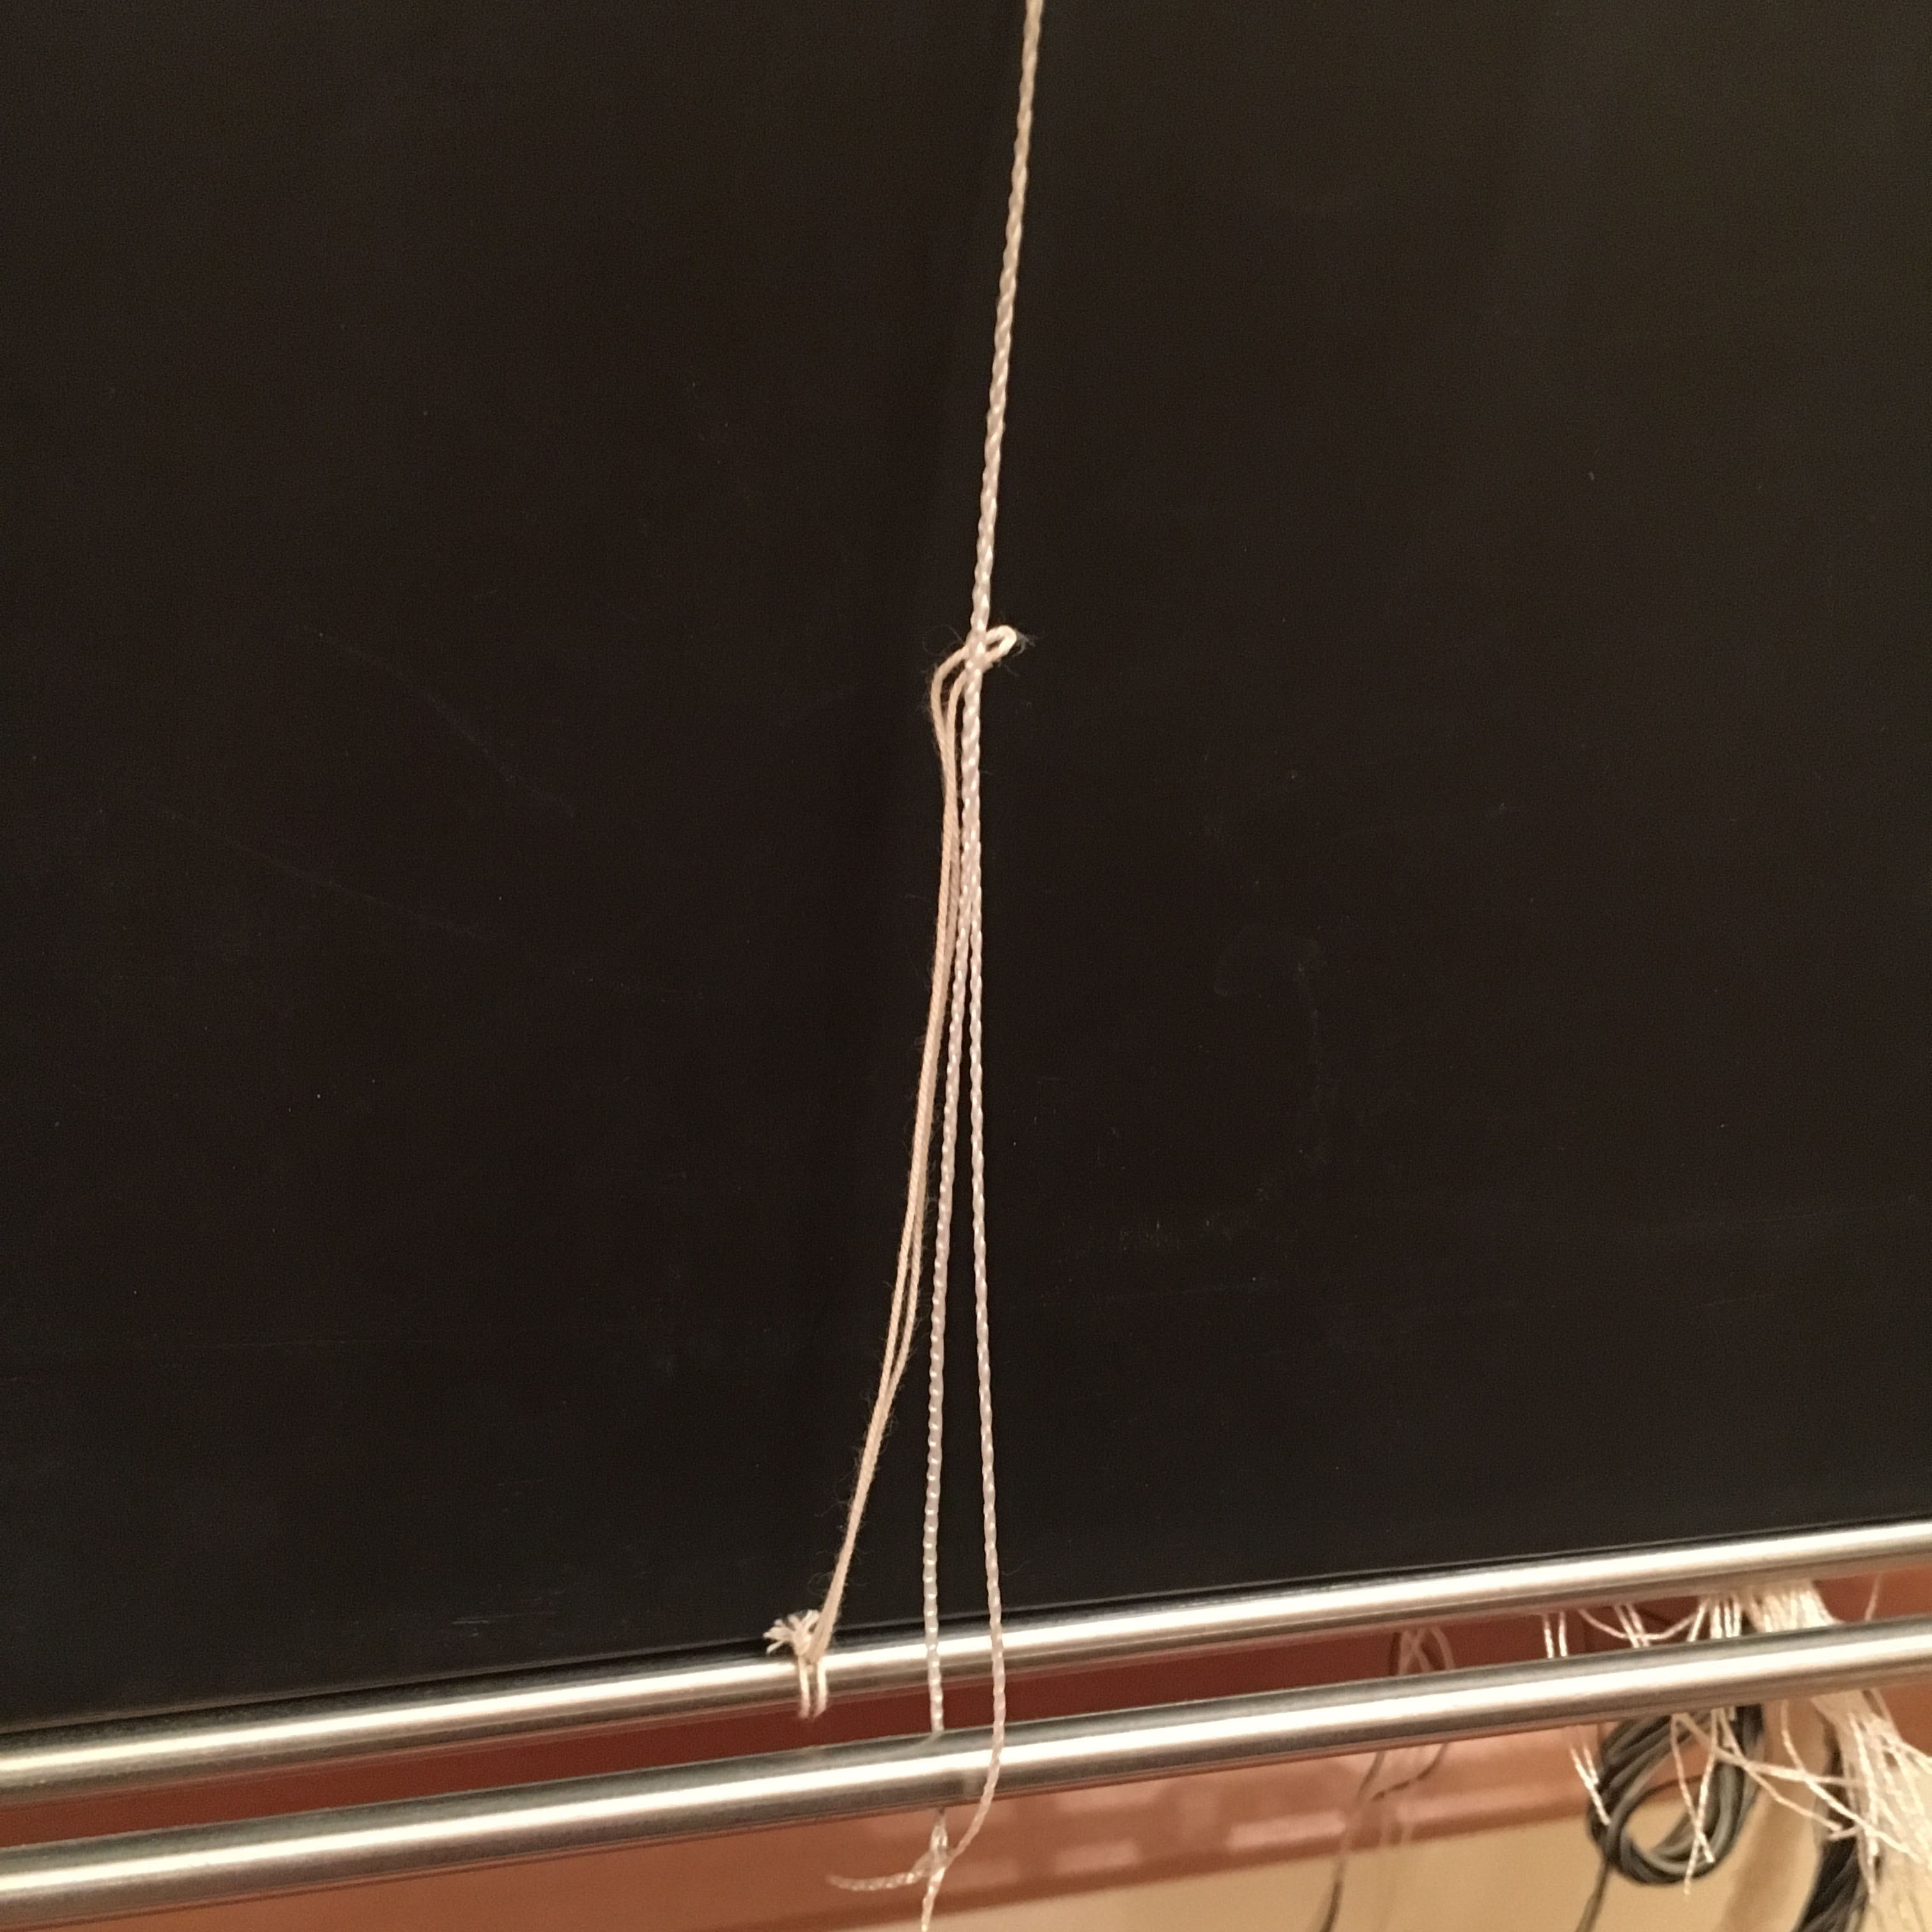
Below shows a doup attached to shaft 2 and poking through an empty heddle on shaft 1. Two shafts are needed to create the twist and two are needed for the twisting warp ends. This is in addition to any shafts needed if other structures are to be included in the fabric. It is important that the doup is not too long and only just reaches through the heddle as this would result in a poor shed. The warp end to be twisted will be threaded through this loop rather than a heddle.
A strong smooth thread works best for the doups. A doup will be needed for every twist required. It’s a good idea to make the doups by tying them around something such as two nails in a piece of wood spaced the required distance apart. They need to all be consistent in length to ensure an even shed.
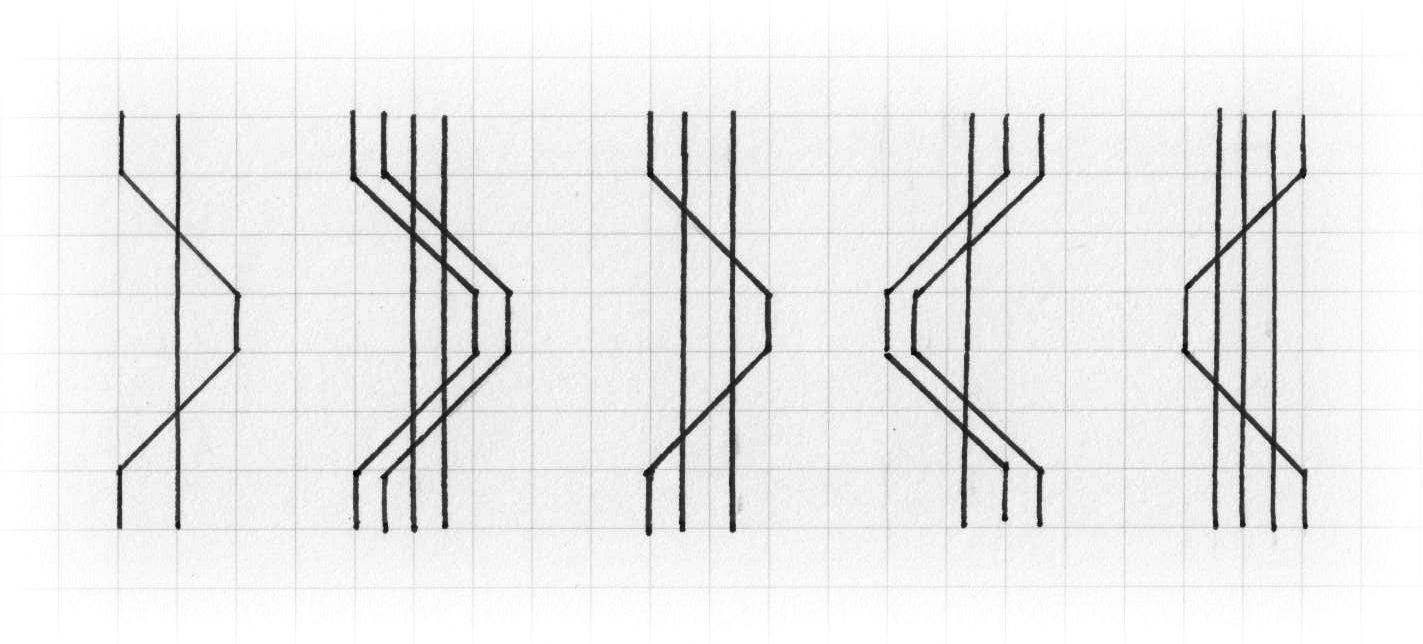
The direction of the twist can be changed and the number of warp ends which twist around each other can be varied. The following shows a selection of options:
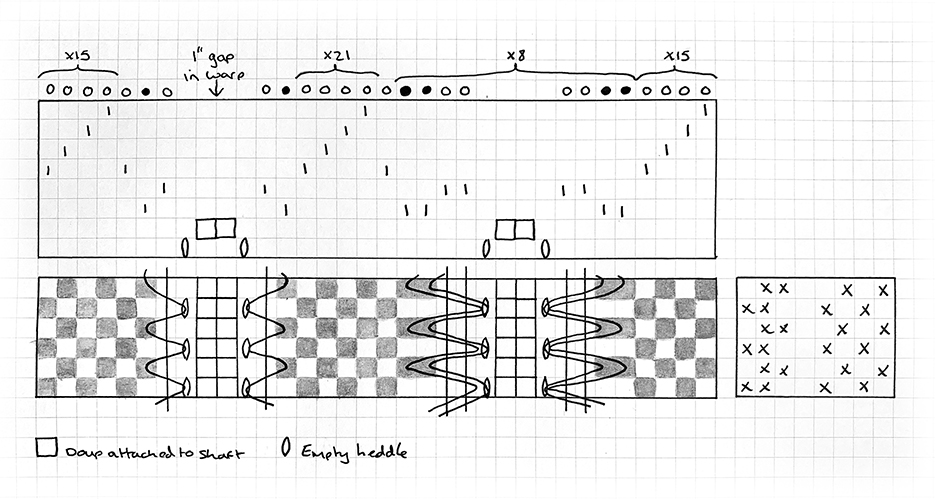
Here is a draft for a weave using doup leno and plain weave structures:
It is important to remember that all the twisting threads (leno ends and warp ends) must be put through the same dent in the reed.
To make it easy to see which warp ends will be twisting these threads are black. All the other threads are white. 8 shafts are used:
Shaft 1 will contain the empty heddle for each doup to be threaded through and will be lifted every time the warp thread is to be twisted. Shaft 2 is where the doups will be attached .This shaft will need to be kept raised throughout the whole weaving process otherwise the leno warp end may be broken. Shaft 3 is for the black leno ends which are the ones to be twisted. This will be lowered when shaft 1 is lifted to create the threads. Shaft 4 is for the warp end that the black end will twist around and remains stationary (lowered) throughout the weaving process. Shafts 5-8 are used for the plain weave of the rest of the fabric.
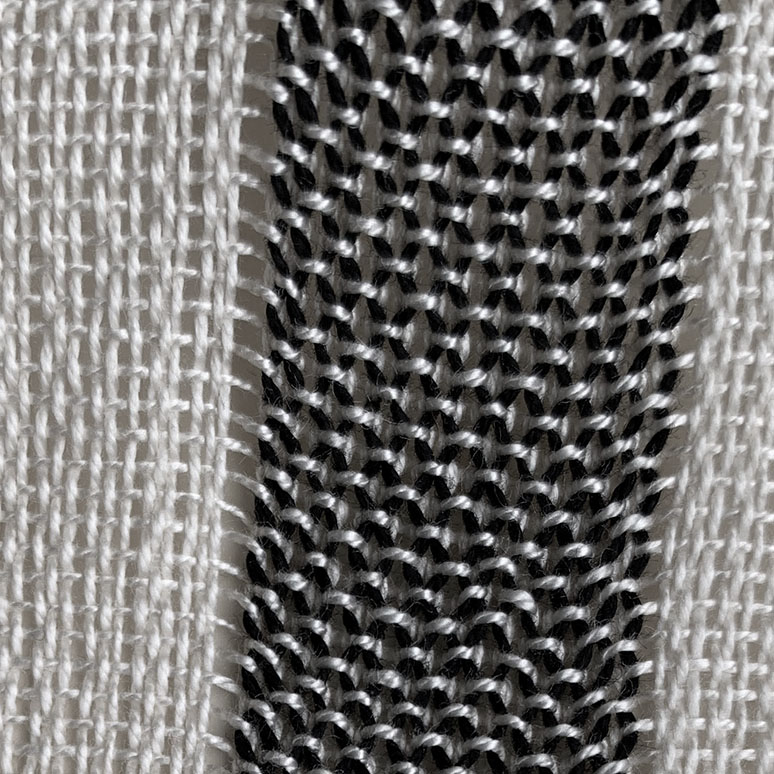
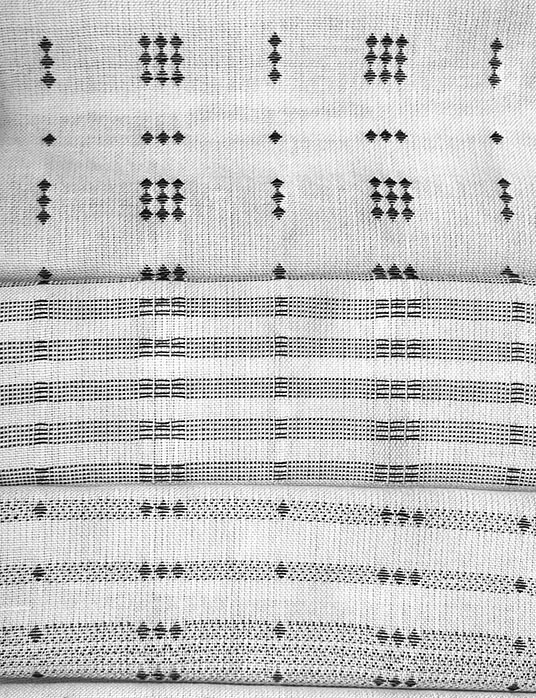
In the draft above there are two sections of Leno on a plain weave fabric. One on the left where just two leno threads are used to stop the warp moving in to a gap in the warp. The second on the right is an area of leno in which two leno ends twist around two warp ends.
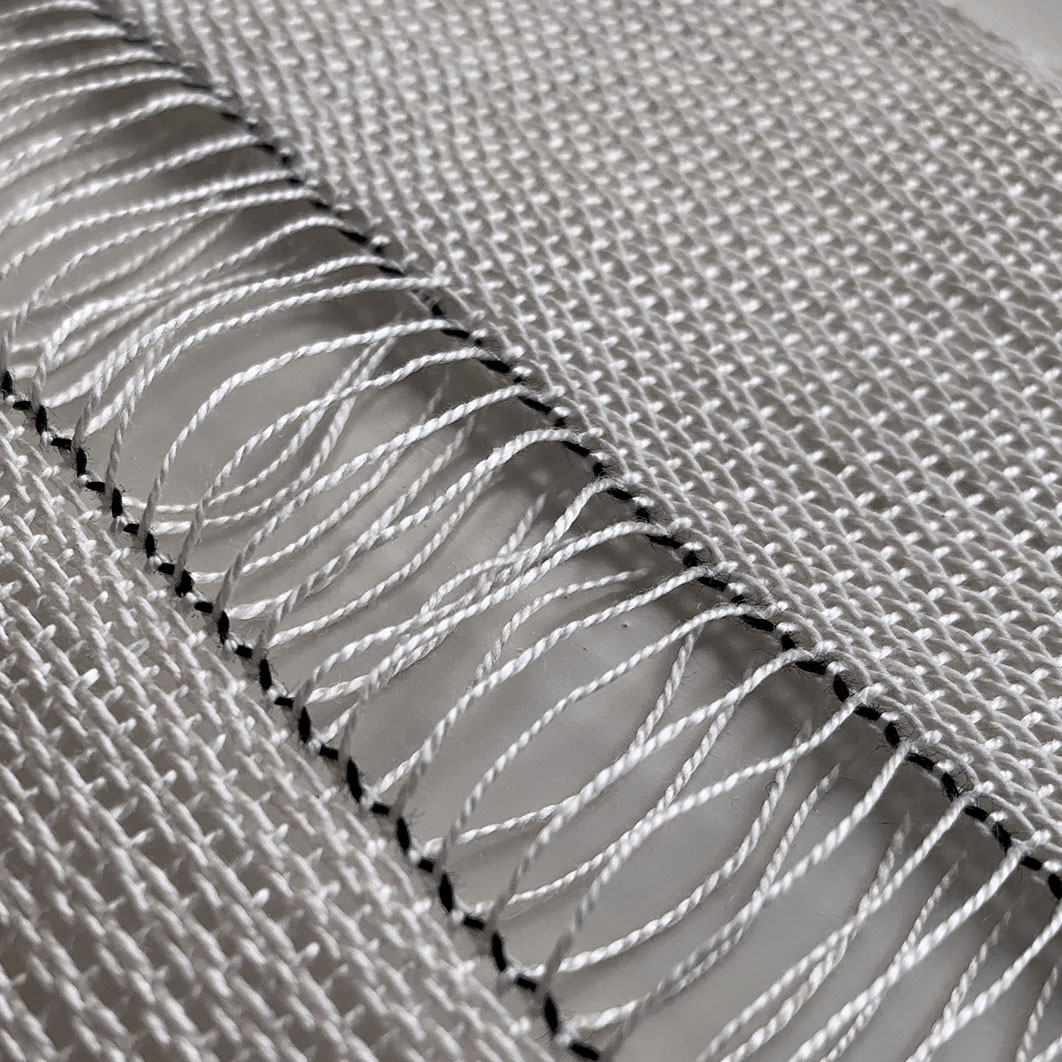
Below are close ups of the two different leno weaves from the above draft as well as a diagram for each to show how the dark leno ends are twisitng.
In an extra weft structure one weft yarn is used to weave a ground cloth and an additional weft is inserted at intervals to create a decorative pattern on the surface on the cloth.
The ground cloth is usually woven with a simple structure such as a plain or twill weave to enhance the extra weft but other structures can be used.
The sections of the warp that will interact with the extra warp to create the pattern are set up on separate shafts to allow it to be woven independently from the ground cloth where required. The number of shafts needed depends on how complicated the pattern is going to be.
For the example below I have used an eight shaft loom. Plain weave is woven across all 8 shafts for the ground cloth (block A and B woven simultaneously). Shafts 5-8 (block B) are only threaded in specific areas and are woven independently to create diamonds at regular intervals throughout the cloth.
The first end in block A after a block of B must be threaded on shaft two otherwise a plain weave structure will not be possible. The best way to spot these potential errors before weaving is to draw out the draft either by hand or on a weave program.
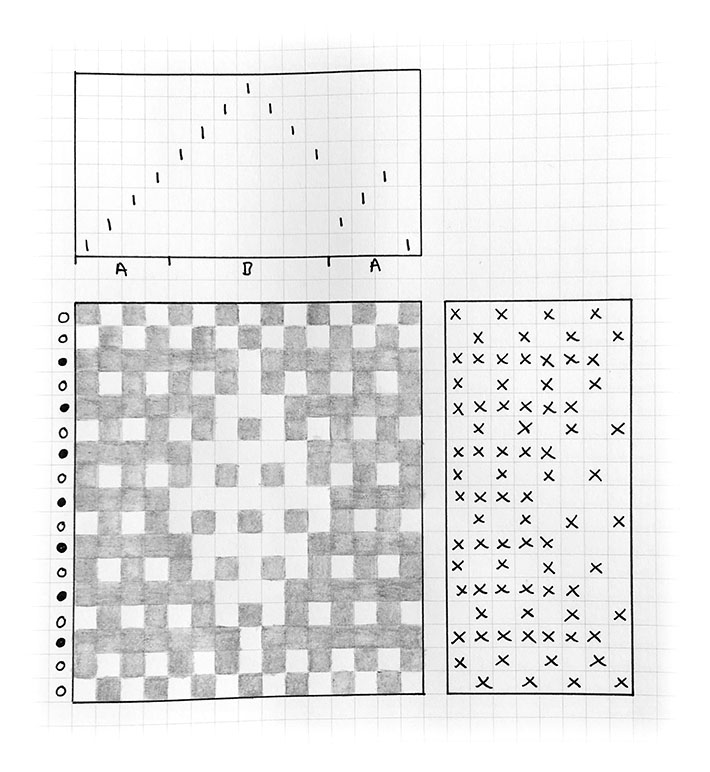
Below is the weave draft showing how a diamond structure can be achieved using an extra weft structure:
To ensure a stable structure around the extra weft diamond, the ground cloth picks are alternated with the extra weft picks. On the left of the draft the filled circles represent the extra weft and the empty one the weft represent the ground cloth.
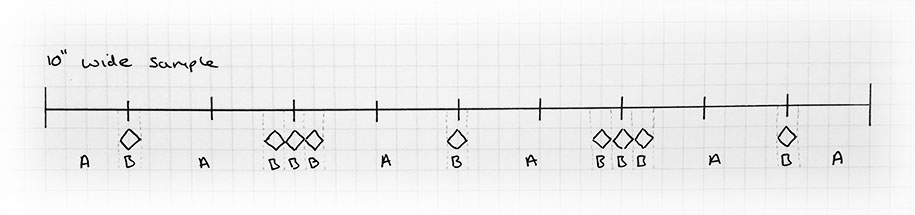
This is how the blocks will be spread throughout the woven sample:
Where there are three diamonds placed right next to each other I have placed one warp end separating them, threaded on shaft two. If they were not separated by this thread there would be one weft pick floating over the middle of all three diamonds. Threading plan for the three diamonds next to each other:
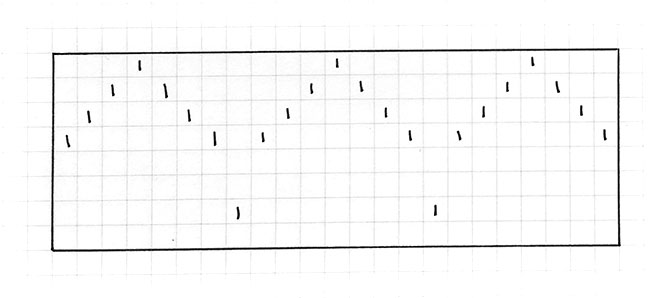
The woven samples below are all woven with the same warp set up. Included is the diamond structure explained above.
Extra weft structures can be used in many different ways to create a vast range of cloths.
Once you have decided on a project you may want to work out how much yarn you are going to need. This may be so you can buy or dye the correct amount without vastly over or under estimating.
The following will take you through the calculation to do this. It looks like a lot but they should be relatively straight forward things to work out. For the sake of simplicity I will work in centimetres/meters but the same can be applied to inches/yards.
The calculaion is as follows:
Total number of ends x total length of warp (m) = amount of yarn needed (m)
How to work out the total number of ends
EPC (see calculating sett) x (width of woven piece (cm) + shrinkage/take-up (cm)) = Total number of ends
The shrinkage/take-up is usually assumed to be 10% of the width of the woven piece but this can vary by a large amount depending on the yarn, structure and finishing. Sampling will give you a more accurate number.
How to work out the total length of the warp
Length of woven piece(s) (m)+ shrinkage/take-up (m) + yarn wastage (m) = Total length of warp (m)
If weaving more than one piece add the lengths together
The shrinkage/take-up is usually assumed to be 10% of the length of the woven piece but this can vary by a large amount depending on the yarn, structure and finishing. Sampling will give you a more accurate number.
Yarn wastage is the amount of yarn used to tie on to the front beam plus the warp woven for even end distribution plus the loom waste (the amount of yarn left on the loom not able to be woven).
It is often easier to work out the calculations in cm and then convert to m by dividing by 100 at the end.
Once you have chosen a yarn(s) to use use for a warp you need to consider the sett. In other words, the number of warp ends you will want to have in your woven cloth per centimetre/inch (ends per centimetre (EPC) or ends per inch (EPI)).
Things that may affect the sett
There are a number of factors that need to be taken in to consideration and may affect the sett you choose:
Weave structure
A weave structure with fewer weft intersections with the warp will require a higher sett. For example a 3/1 twill will require a higher sett than a plain weave.
Final use/aesthetics of the fabric
If the final outcome is to be a lightweight scarf then the sett may need to reduced considerably. On the other hand if the fabric is to be cut and sewn a much higher sett is needed so it holds together well. A higher sett will also make it harder wearing.
Personal preference
Some weavers prefer to use a slightly higher/lower EPC/EPI and may also beat down their weft harder/more softly.
Bearing this in mind the below is only a guide and other factors will affect the sett.
How to work out the sett
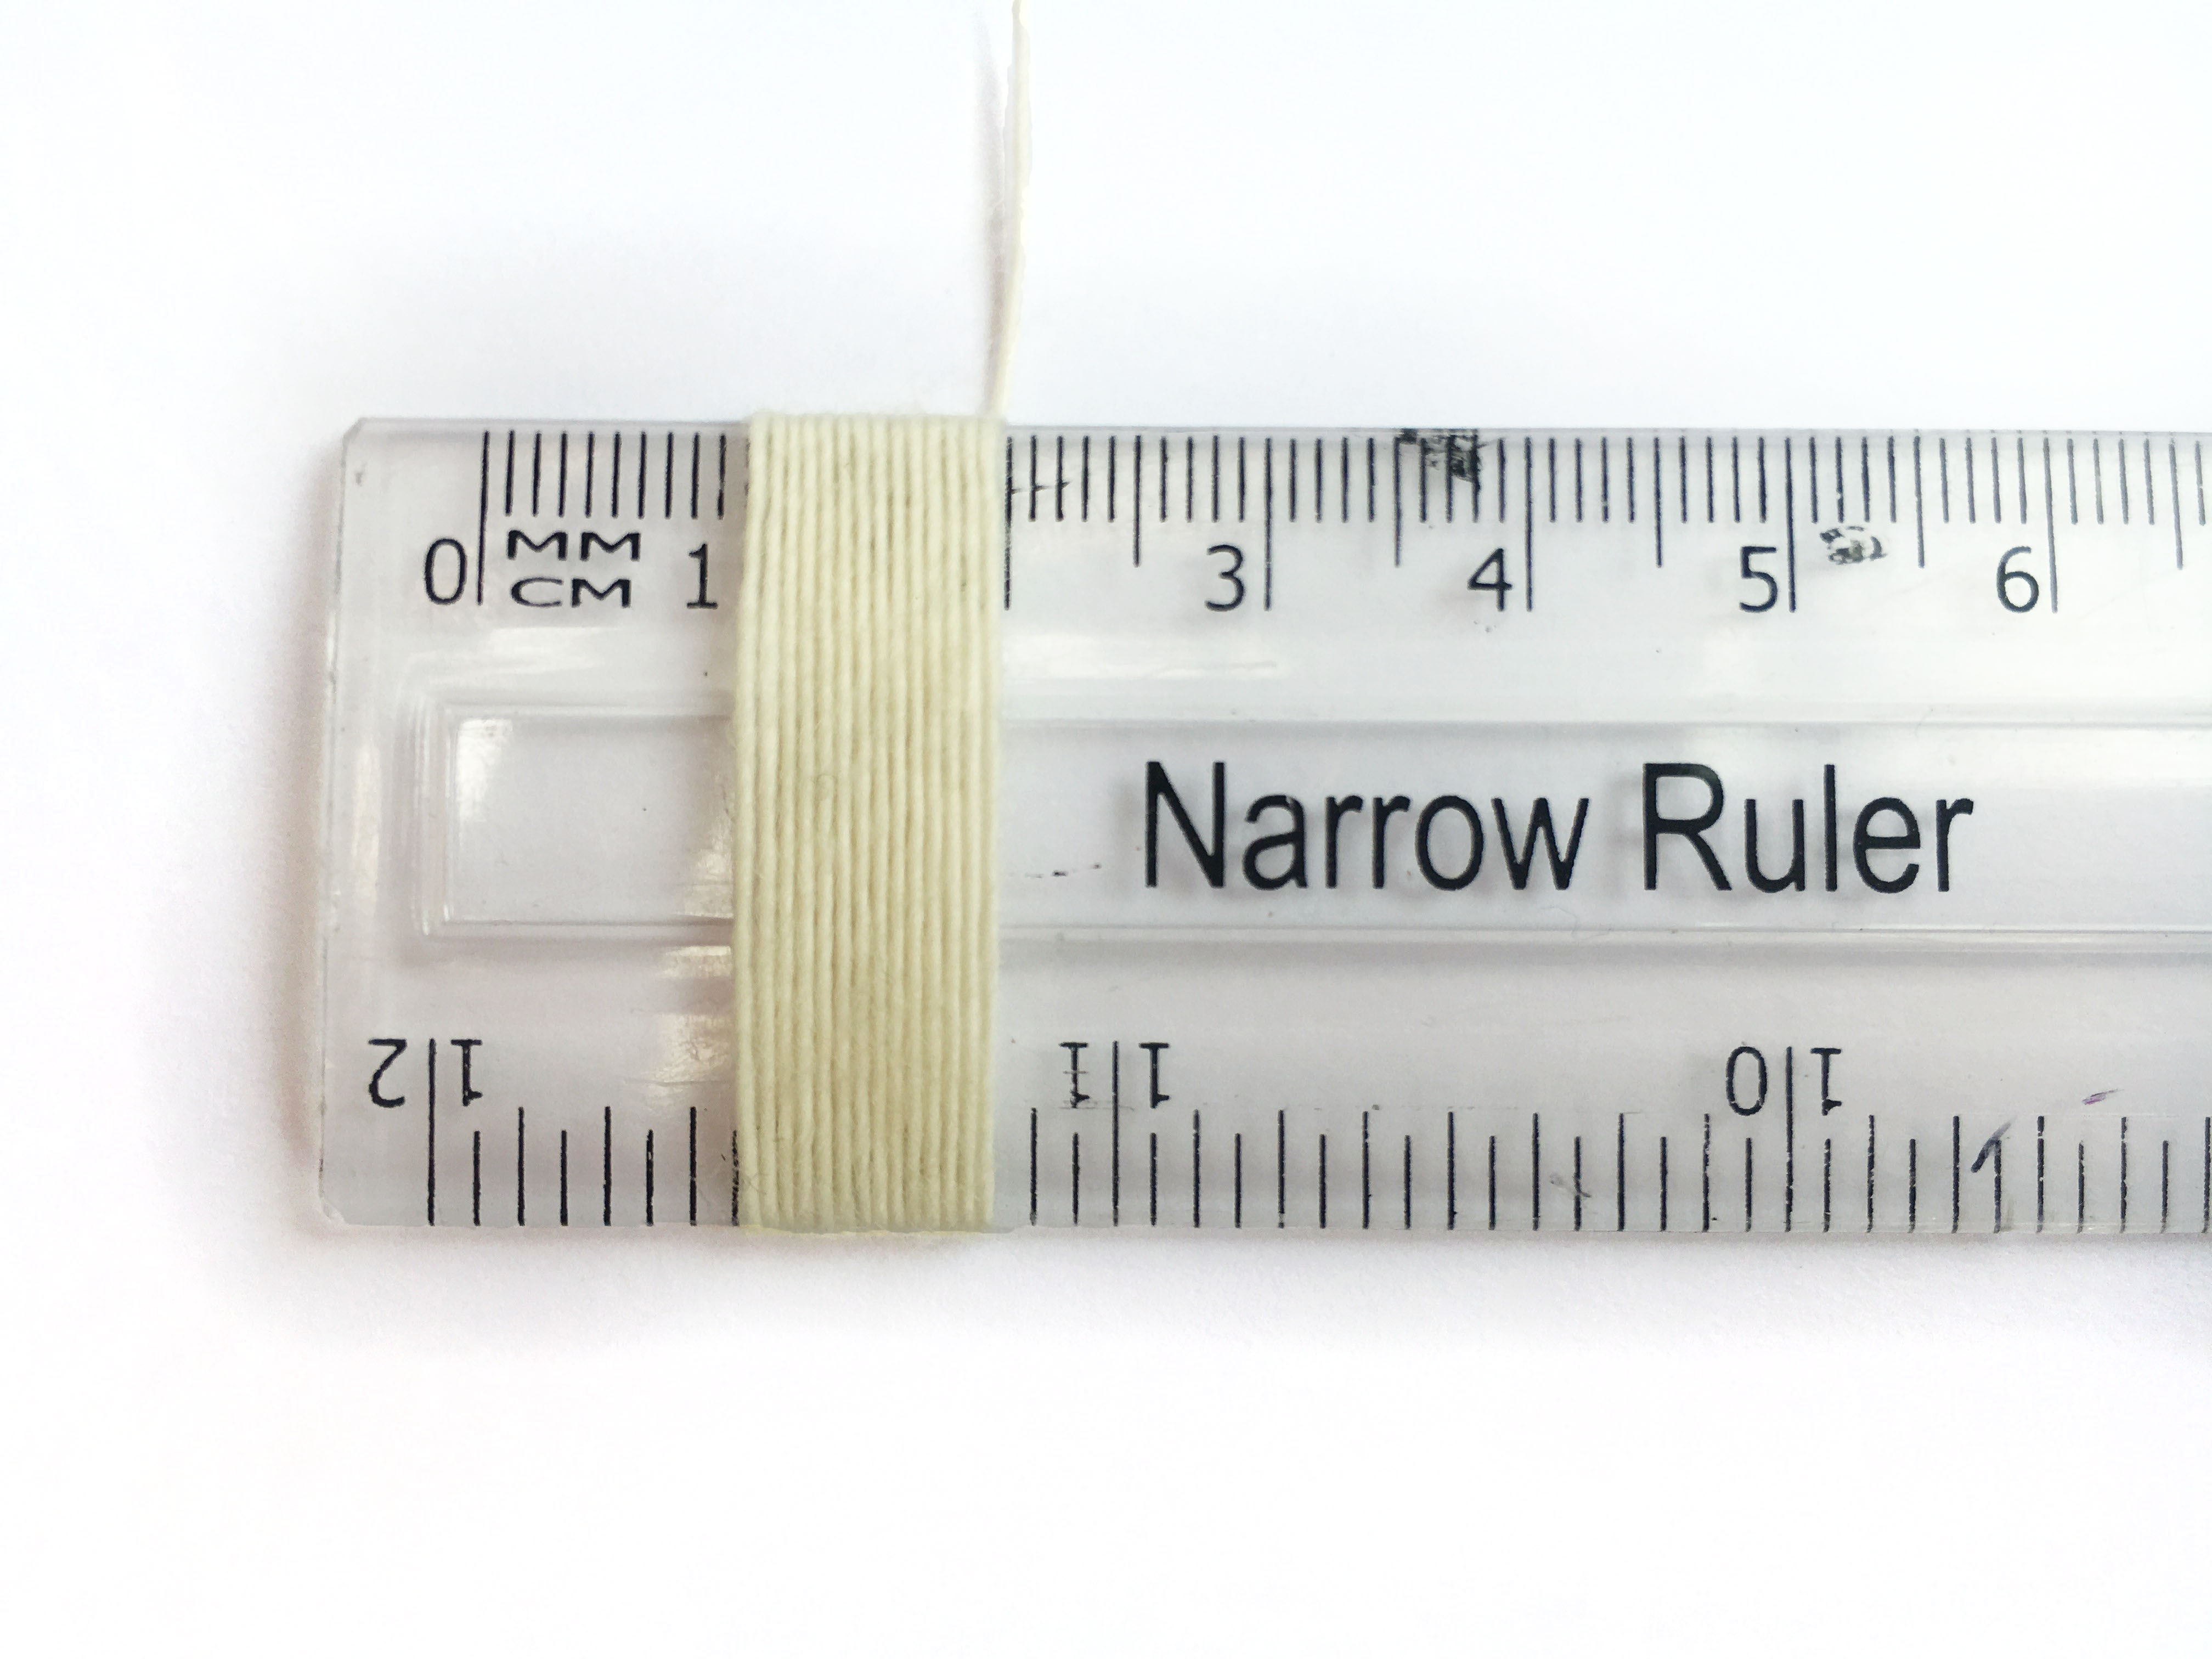
To work this out you need to take your yarn and wrap it around a ruler. Do this with no gaps between but ensure the yarn does not bunch up or overlap. Wrap it around in a 1 cm or 1″ section as shown below.
Dividing the number of times the yarn was wrapped by 2 gives you the EPC/EPI of your woven cloth.
This method is usually a good indicator of the number of ends you will need for a balanced plain weave structure. When we talk about a balanced plain weave we mean a plain weave where the warp and weft are equally visible, neither one dominates the other.
For a balanced twill you would use 2/3 of the number of ends round the ruler.
In the photo above the yarn was wrapped around the ruler 14 times within 1cm. This means I would want to start with 7 EPC for a plain weave or 10 EPC for a twill.
If different structures are to be woven then the EPC/EPI will need to be adjusted. There is a formula to work this out mathematically which can be confusing. It may also be affected by previously mentioned variables which cannot be taken into consideration with a formula. The formula is as follows:
S= T X R bn(I + R)
S is the sett.
T is the number of times the yarn was wrapped around a ruler.
R is how many ends there are in one repeat.
I is the number of weft intersections in one repeat.
I personally prefer to use the first method mentioned and adjust it taking all other aspects of the woven piece in to consideration. Sampling really is the only way to get just the right sett.
Yarn is made from a variety of different fibres and it is important to have an understanding of where these fibres come from. The following table show some of the most common types and their origin:
Fibre type
Yarn
Origin
Natural (cellulose)
Cotton
White boll which surrounds the seed of the cotton plant
Flax/linen
Filament fibre from flax plants
Hemp
Hemp plant (a Angiosperm phylum)
Jute
Corchorus olitorius plant
Ramie
Bark of Boehmeria nivea
Sisal
Leaf of the Agave sisalana plant
Bamboo
Stem of the bamboo plant
Paper
Wood pulp
Abaca
Leaf of the banana plant
Banana
Stem of the banana plant
Pineapple
Leaf of pineapple plant
Coir
Husk of the coconut fruit
Lyocel (tencel)
Wood pulp
Seacell
Wood pulp and seaweed (algae)
Natural (protein)
Sheep wool
Sheep hair
Alpaca
Alpaca hair
Cashmere
Cashmere goat
Mohair
Angora goat
Angora rabbit
Angora rabbit
Camel
Camel hair
Horse
Horse hair
Lama
Lama hair
Mulberry Silk
Silkworm cocoons
Tussah silk
Tussah silk moth cocoon
Synthetic
Vicsose
Wood pulp
Rayon
Cellulose from a variety of plants
Polyester
Synthetic resin
Elastane
Minimum of 85% polyurethane polymer
Acrylic
Minimum of 85% acrylonitrile monomer
Some fibres come from a natural source but are classed as synthetic. This is due to the manufacturing process the fibre has gone through to and whether the end fibre is biodegradable.
When choosing a yarn it is important to consider the twist and ply as this affects how the yarn behaves.
Twisting yarn is the process of wrapping together (in a spiral motion) fibres to make a singles yarn and then singles to make a plied yarn. Twisting fibres together, such as when spinning, gives the fibres the strength to be woven in to cloth. Twisting these singles together to make a plied yarn adds even more strength.
The ply of a yarn is the number of singles that have been twisted together to make up a yarn. A single yarn would have a ply of one.
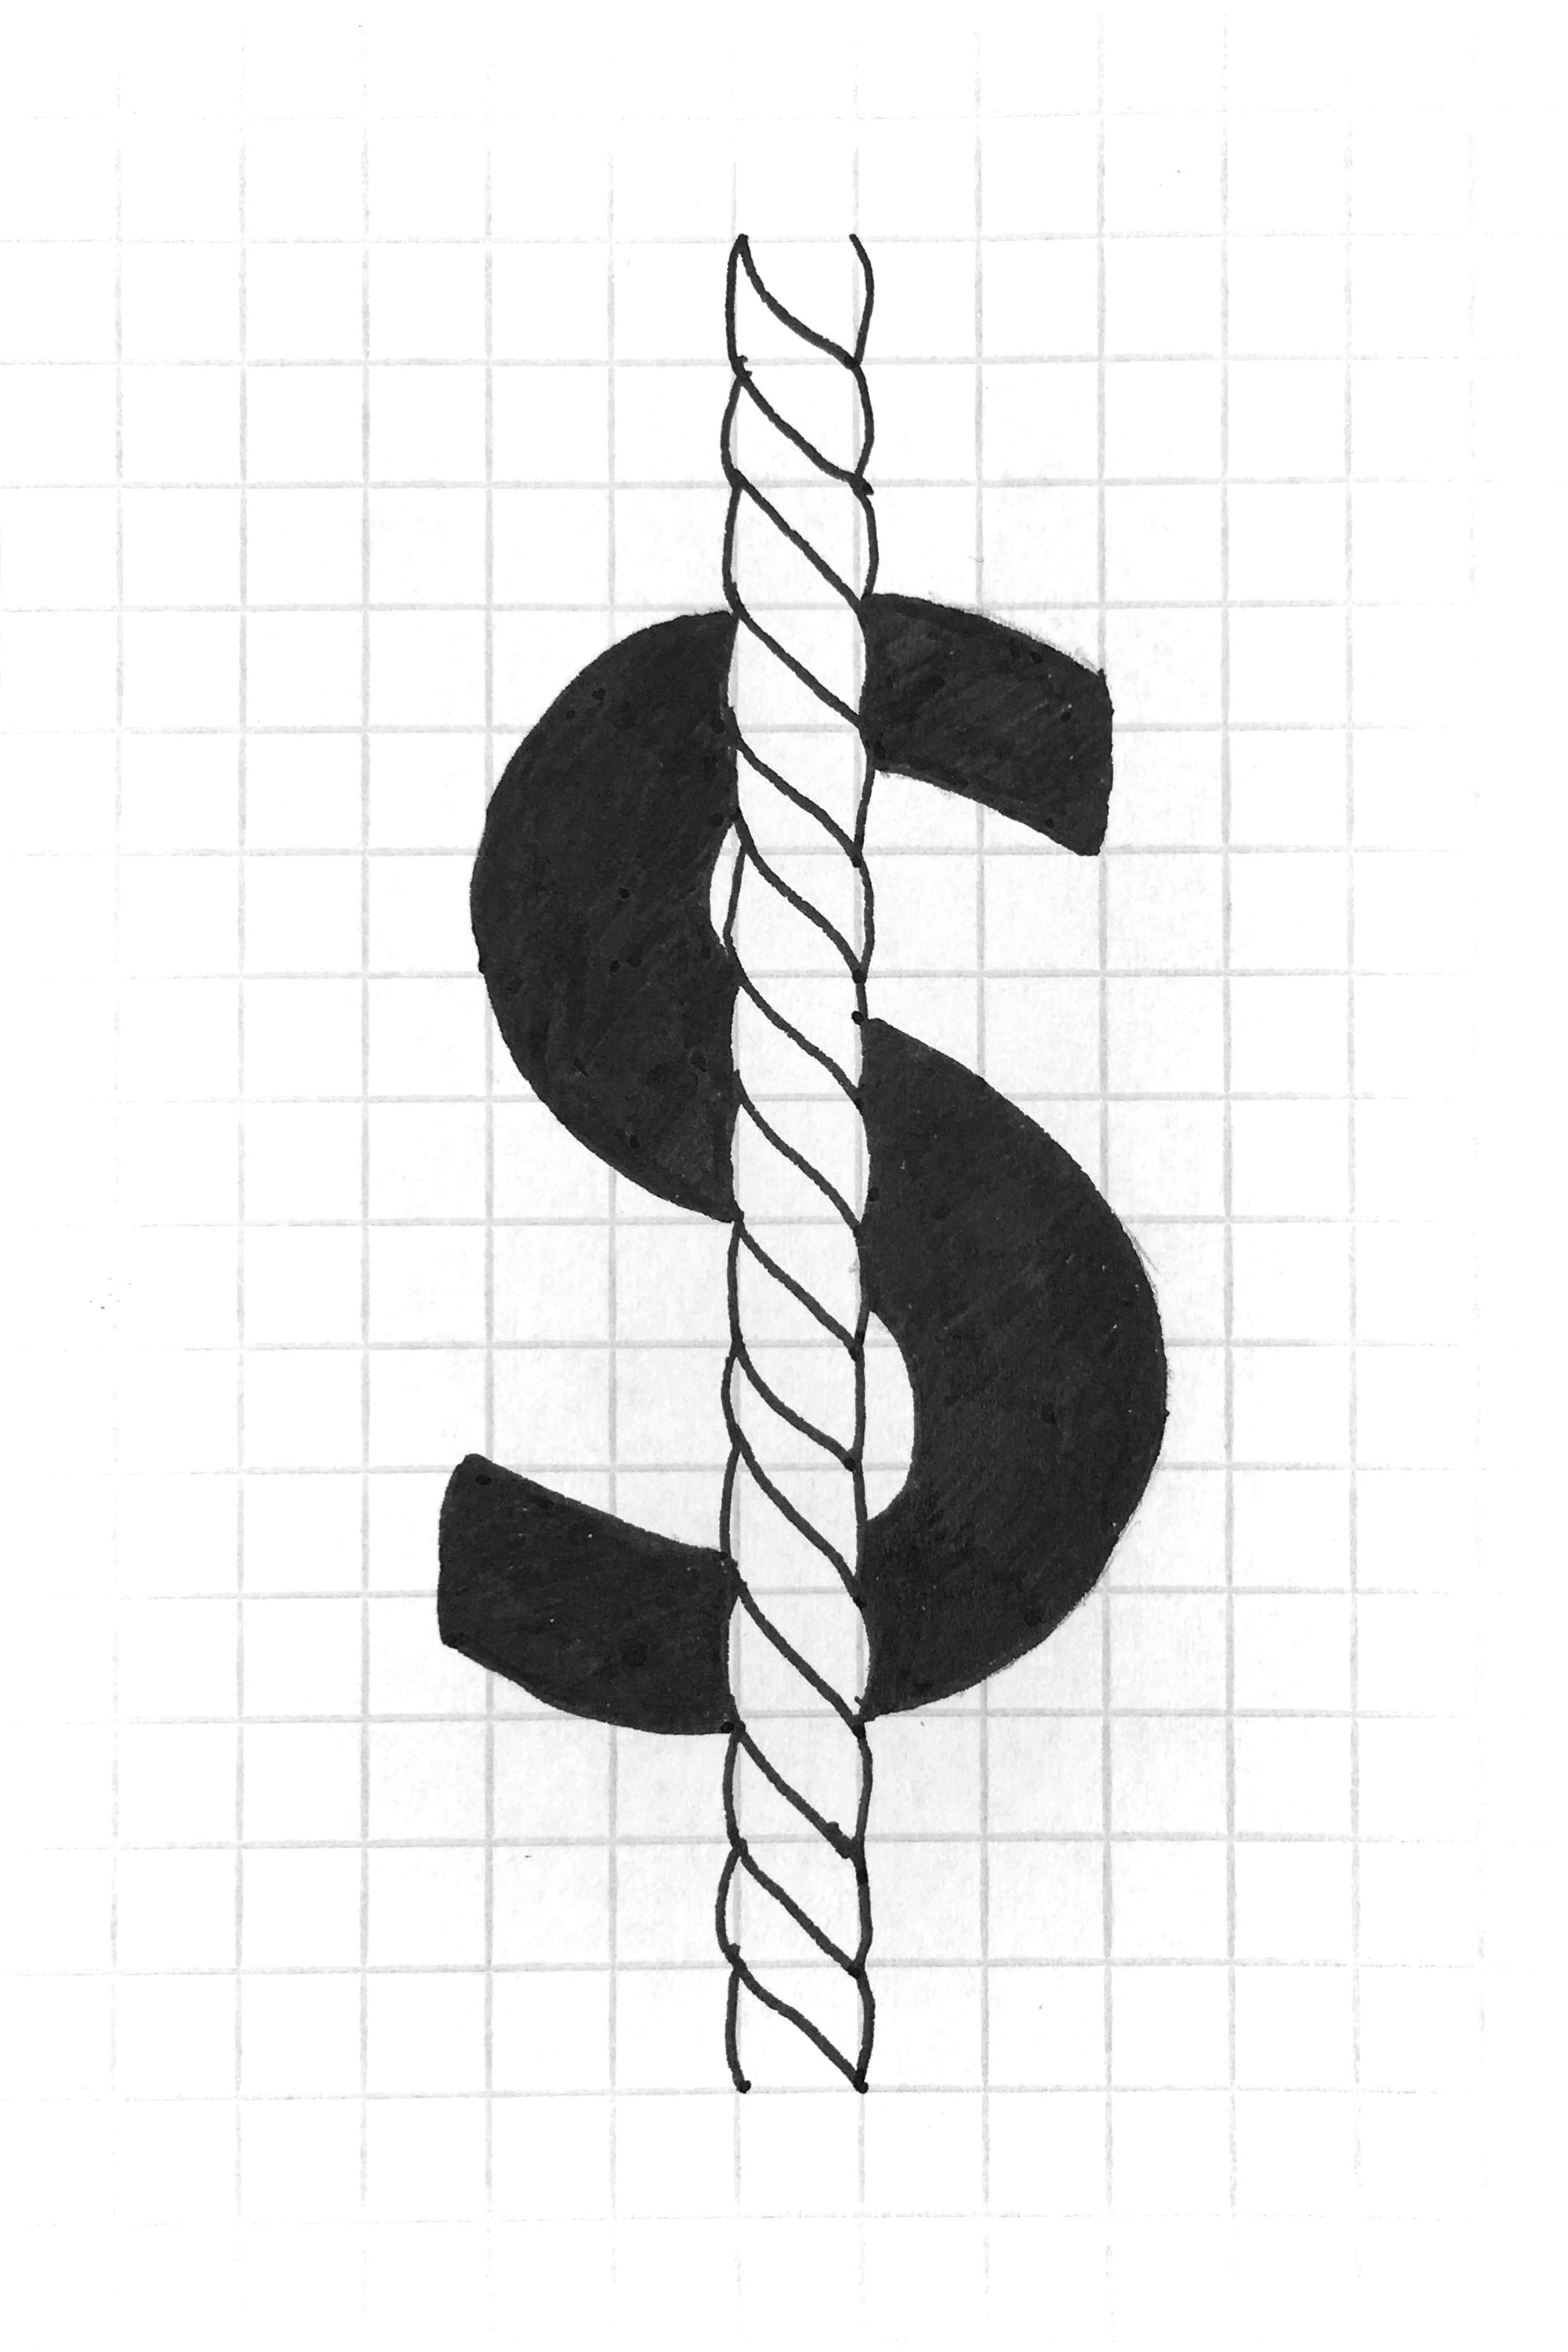
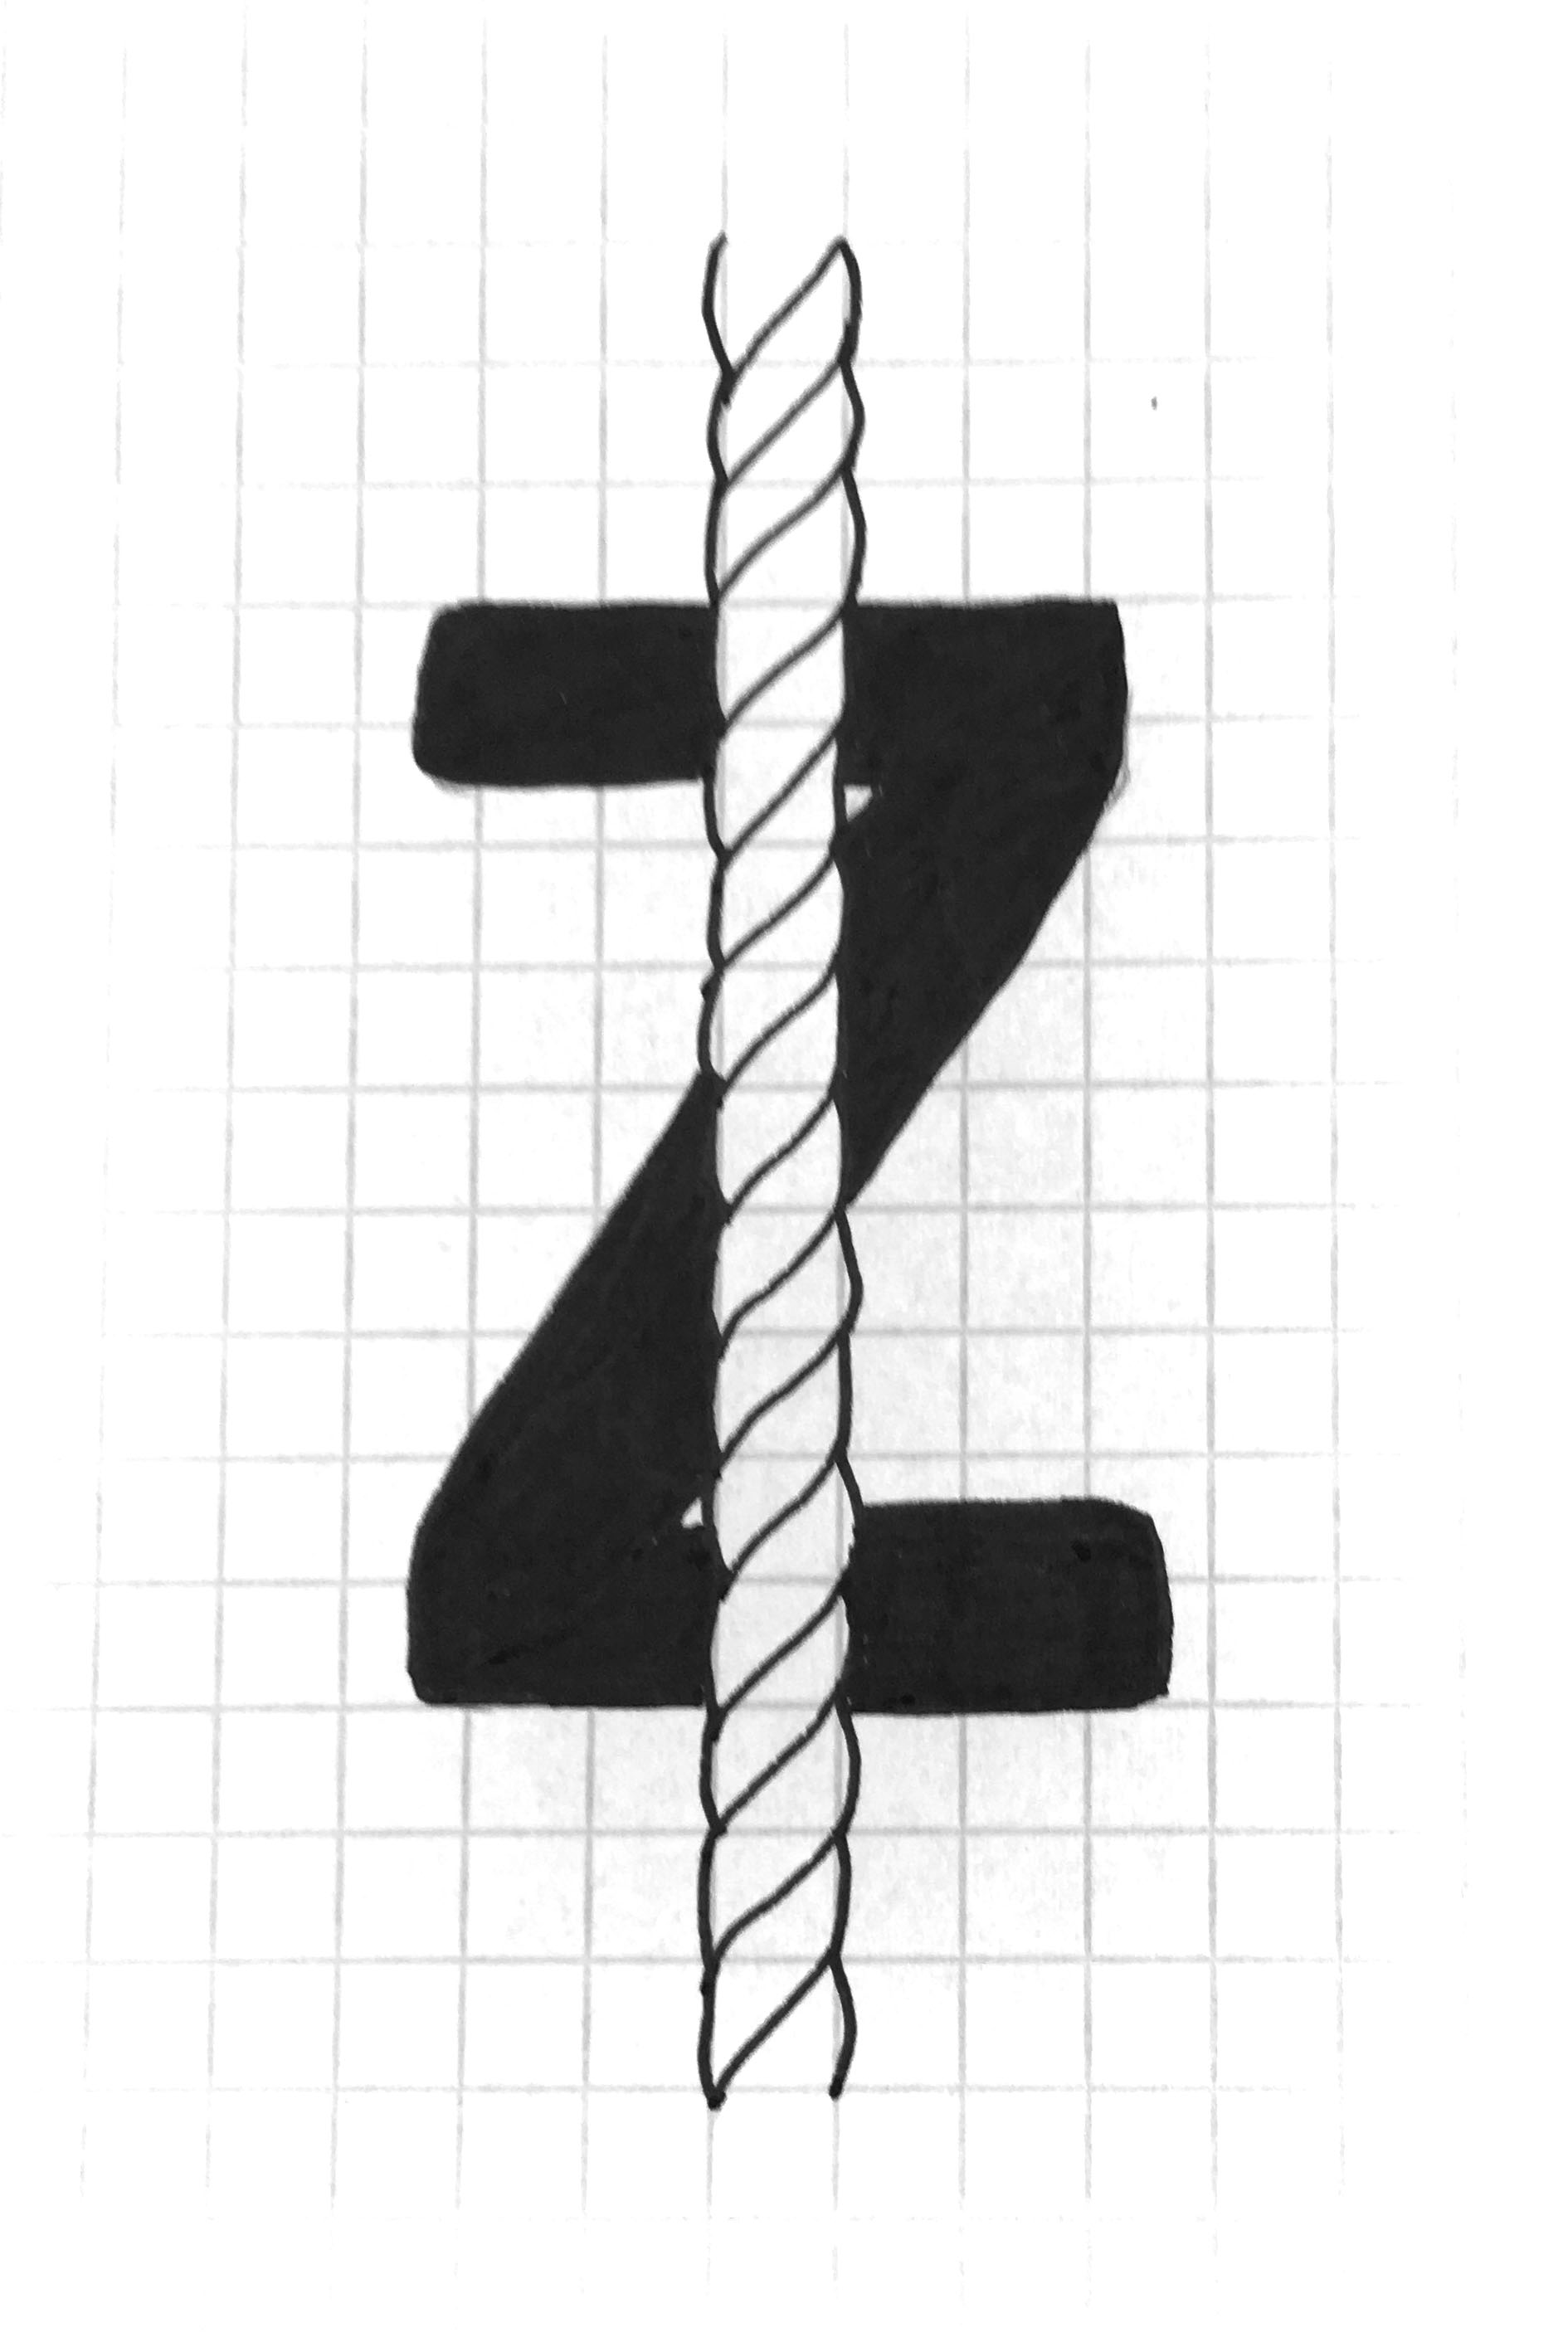
We describe the twist of a yarn as either an ‘S’ or ‘Z’ twist. To determine which way a yarn is twisted, hold the yarn vertically and visualise the diagonal in each of these letters. If the fibres appear
to be going in the same direction as the diagonal in an ‘S’ then it is an ‘S’ twist yarn. If they are going in the opposite direction then it is a ‘Z’ twist yarn.
Why is it important?
When yarn has been plied together the single strands are often ‘Z’ twist yarns which are then plied in an ‘S’ direction. If multiple ply ‘S’ twist yarns are then to be plied together, such as in a cord, they would be twisted in a ‘Z’ direction. Alternating twists in this way gives the yarn stability and strength.
If a yarn is plied together using the same direction twist as the single strands, for example the single strands were twisted in a ‘Z’ direction and the yarn was also plied in the ‘Z’ direction the resulting yarn will have a tendency to curl. This is apparent in fabrics such as voile.
The number of twists per meter is also important. This information is not always given with the yarn as standard but it will be displayed a TMI (twists per metre or TPI twists per inch). Some yarns are highly twisted and have lots of twists per meter while others are more softly twisted with less twists per meter. Shorter staple fibres will need a higher twist than longer staple fibres to give them the strength needed to be woven.
As a yarn’s TPM increases as does it’s strength until it reaches it ‘optimum twist’ (different for every yarn). Optimum twist is when the yarn is at its strongest. If twisted more than this it starts to weaken. weakening the yarn in this way is sometimes necessary to create a desired effect.
How twist and ply is applied
The twist of a singles/yarn defines the characteristics of the yarn:
Low twist yarns
High twist yarns
Softer (produce softer, lighter fabrics)
Smoother, harder and stronger (produce finer, crisper fabrics)
Absorbent
Can be water repellent
Less hard wearing
More resistant to abrasion and pilling
Fabric more relaxed and less likely to curl
Very high twist yarns are lively and the fabric more likely to curl
It is very important to consider the twist of a yarn when weaving a fabric as this may help us us achieve a desired fabric. These are a few examples of some fabrics in which the twist is very important:
Fabric
Twist characteristics
Crepe
Very highly twisted yarn
Voile
Fibre spun in ‘Z’ direction with yarn also spun in ‘Z’ direction. High twist yarn which likes to curl but also creates transparency.
Poplin
Yarn which has been spun in an ‘S’ twist using two singles spun in ‘Z’ twists.
Herringbone structured fabric
When the yarn twist and direction of the twill structure are in opposite directions the twill will be more prominent e.g. ‘S’ twist yarn with ‘Z’ direction twill
Sewing thread is made up of three ‘S’ twist singles then plied in a ‘Z’ direction which creates a tear resistant yarn.