In 2012 I made Cedric, a hand woven teddy bear, who was displayed at the V&A after appearing on Paul Martin’s Handmade Revolution. After seeing the rerun in 2016, Lucia Wilson contacted me about writing a children’s book.
We now have three Cedric stories. These have been put together in a book, The Adventures of Cedric the Bear, written by Lucia Wilson, created by me and illustrated by Anne Bowes. For more information have a look at our Cedric website here.
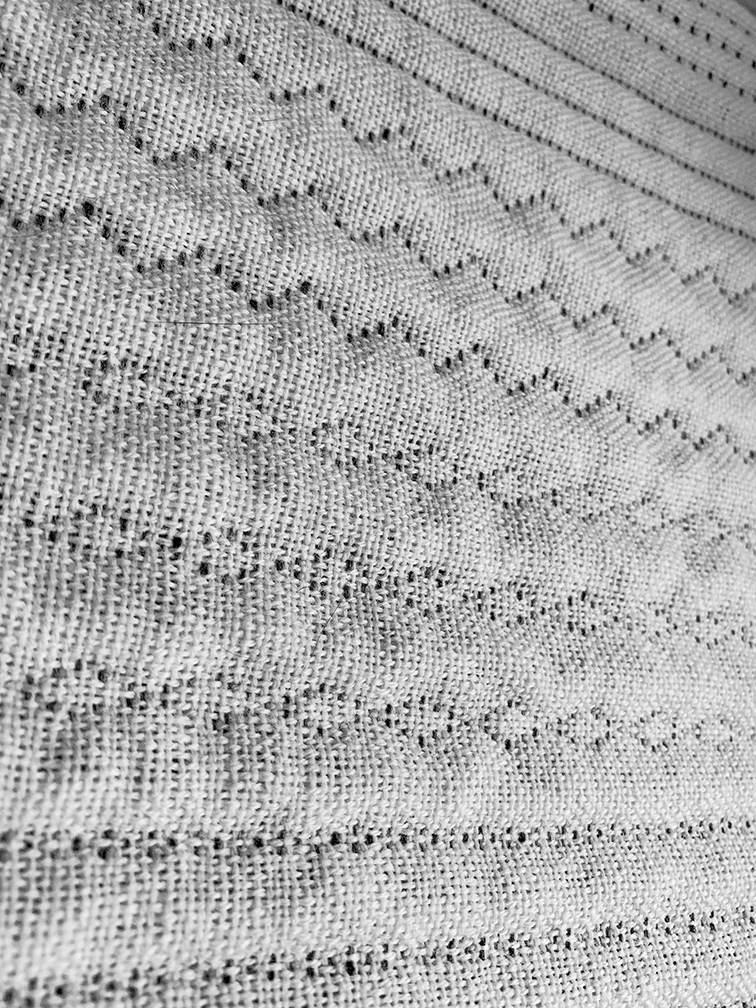
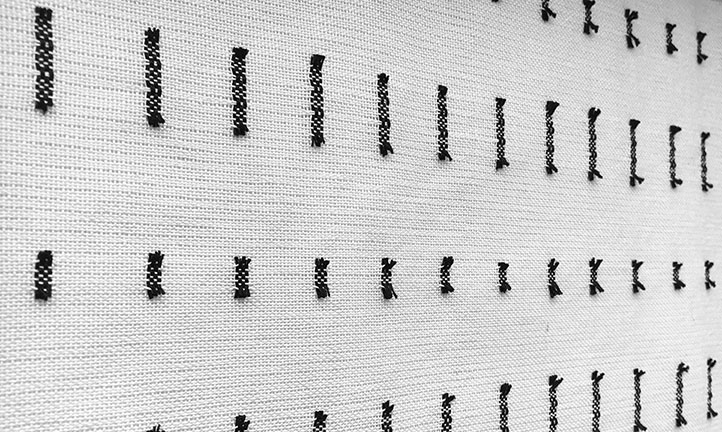
A pique weave is essentially a weft wise cord. It is characterised by raised, wadded areas across the width of the cloth. A face cloth is woven, usually using a plain weave but doesn’t have to be, which is then padded to create a raised surface. At regular intervals stitcher threads, from a separate warp which has remained hidden behind the cloth, are woven in to the face cloth to create an indentation. In the example above the white ends are the plain woven face cloth and the black threads are the stitcher ends.
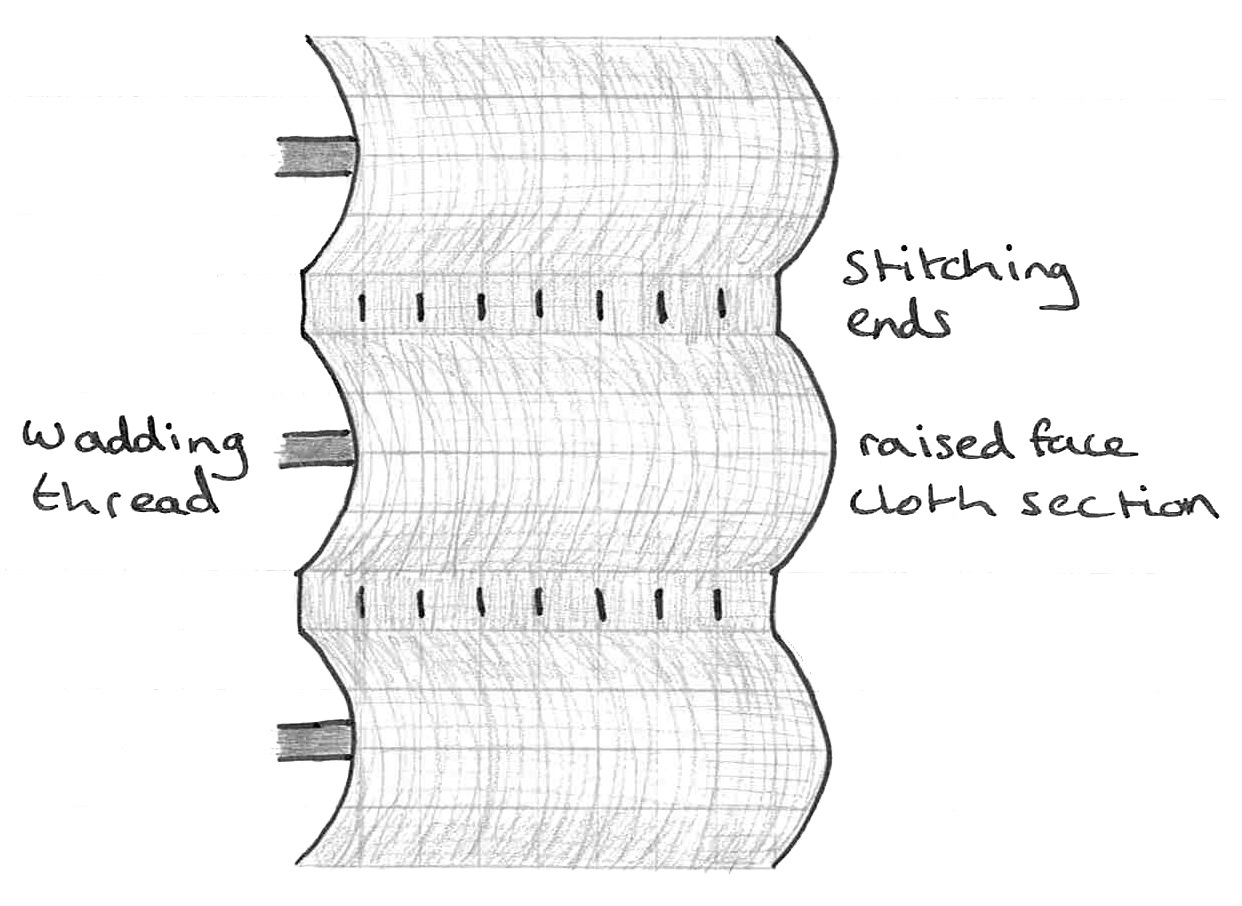
Two warps are used, one for the face of the cloth and on for the stitcher ends. These are usually at a ratio of one stitcher end for every two face ends. These stitcher ends are used to separate the raised wadded areas and are hidden behind the face cloth when not needed. A wadding thread, usually a thick yarn, is inserted in the middle of each section of face cloth to create a raised surface. The stitching ends are brought up at the end of each section and woven in to the face cloth for one or more picks. This secures the face cloth down and creates an indentation across the width of the fabric between weaving each section of face cloth.
The face and stitcher ends need to be on separate beams to allow the face ends to be woven at a lesser tension so that they are able to raise over the wadding creating height.
A non slippery yarn is best to avoid the weft slipping along the warp. A Pique can be woven as a loose backed cloth or fast backed cloth. This means that the stitching ends are either floating on the back of the cloth (loose backed) or woven into the wadding on the back of the cloth (fast backed). A loose backed cloth is fine when the back is not going to show. For practicality the back may need to be woven to stop it from catching. There are multiple ways to vary your Pique:
The raised, wadded areas can be narrow, wide or a combination of both. However if they are too wide definition may be lost and if they are too narrow they may not show up well.
The stitching threads could simply be brought up for one pick or for several in a more decorative pattern.
The wadding can also be varied. A small amount of wadding can produce something subtle or something thicker will produce a more dramatic effect.
Below are some example drafts.
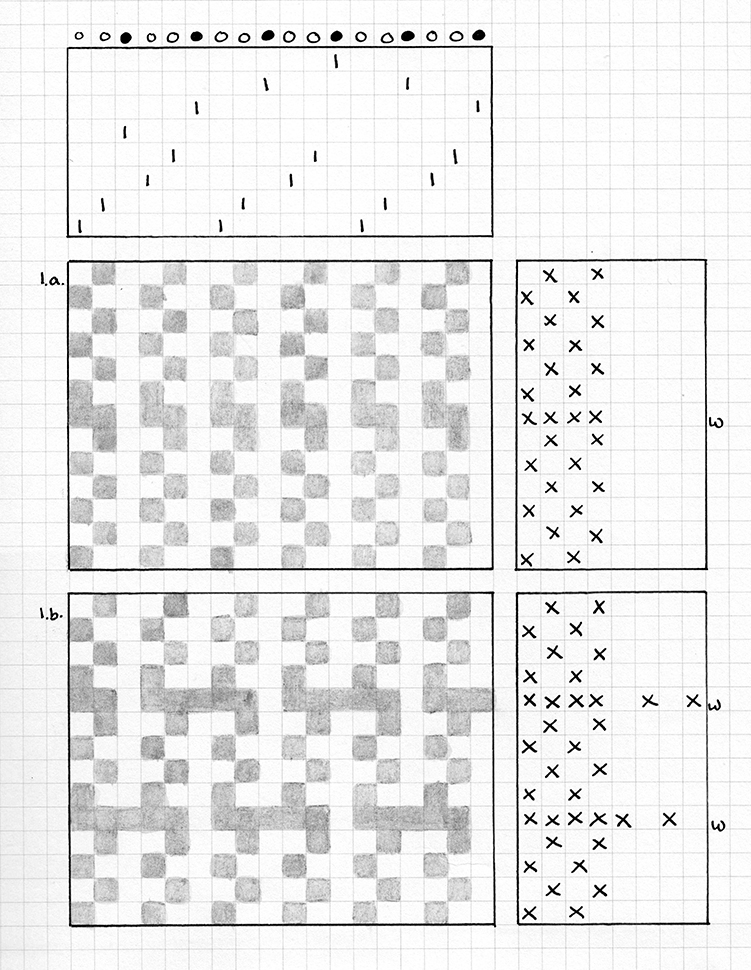
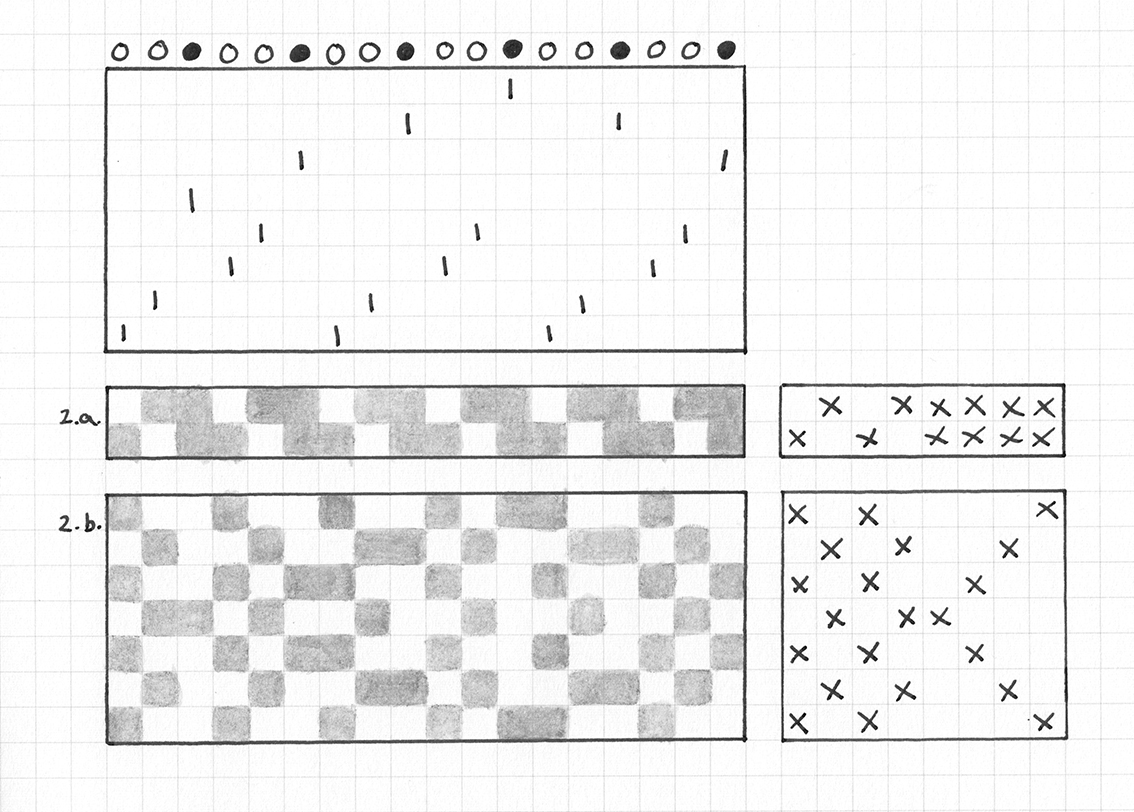
This draft below shows how the raised area could be woven as either a loose backed pique (1.a.) or a fast backed pique (1.b.). The stitcher ends would be woven in before and after each section.
The face ends (white) are on shafts 1 – 4 and the stitcher ends (black) are on shafts 5 – 8. In the loose backed cloth the stitcher ends are left to float behind the face of the cloth which is being woven as plain weave. In the fast backed cloth the sticher ends are woven as plain weave in to the wadding thread(s).
The wadding thread(s) are inserted in each pick where all of the face ends are raised.
The number of plain weave picks can be varied to make the wadded areas wider or narrower. The amount of wadding can also be increased or decreased to vary the prominence on the raised areas.
This draft below shows two examples of how the stitcher ends can be woven. They are called stitcher ends because they act like stitches holding the farbic down between each of the raised areas. in the first example the stitcher ends would be raised for two picks between the wadded areas before lowering behind the face cloth again. I find that if the stitcher ends are raised for only one pick then they get lost and don’t show up. In the second example the stitcher ends are raised multiple times between the wadded areas in a diamond pattern. These ends can be raised and lowered as many times as desired to create different effects.
These stitcher drafts would be inserted before and after one of the face weaves above. For example you might choose the loose backed face cloth weave above and alternate it with the first of the stitcher drafts below.
The Winchester BA degree show is great and well worth a visit. Naturally I was drawn to the textiles and weave students.
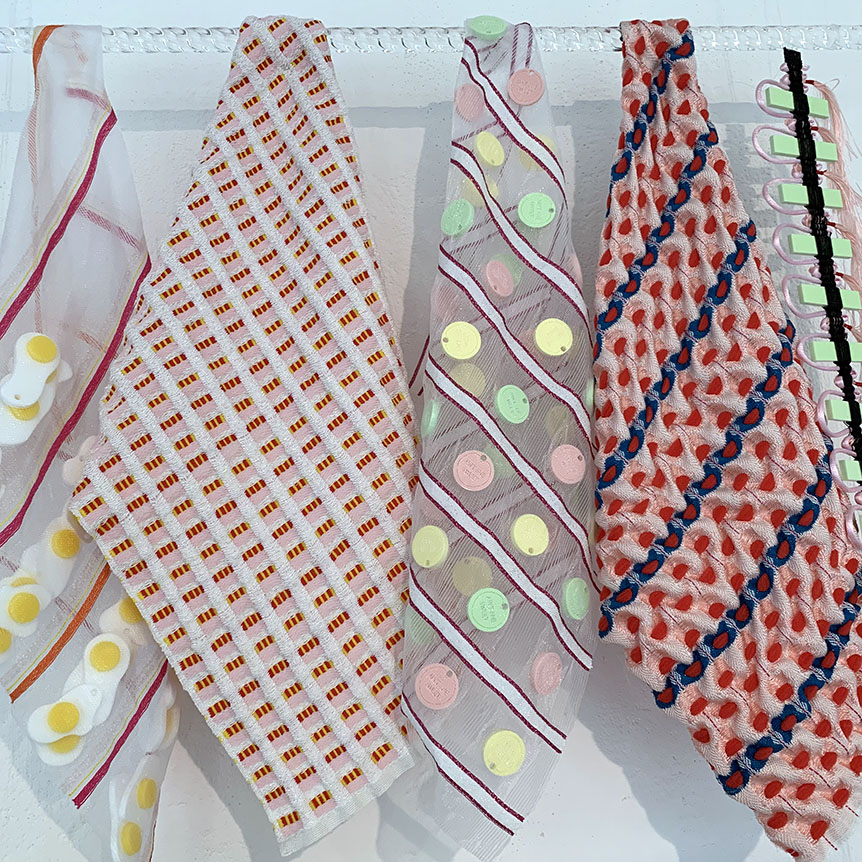
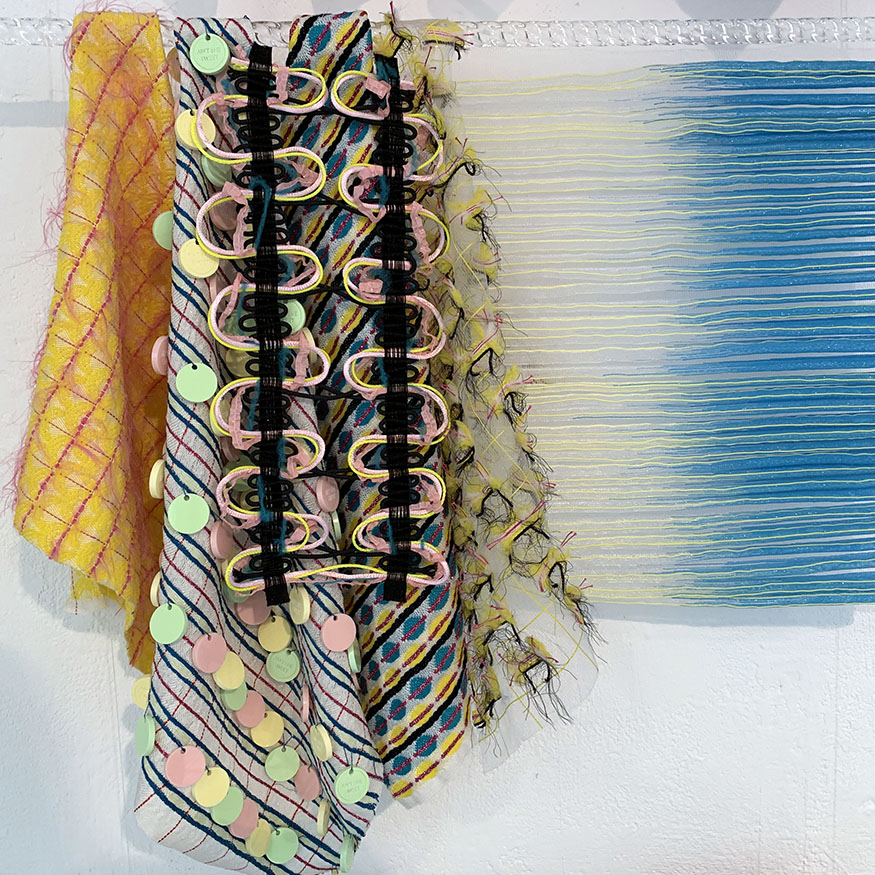
Some of the weaves were really strong and I was intrigued to see that quite a few of the students used monofilament or silk filament yarn to create transparent areas contrasted with heavier yarns.
During my degree I was really interested in creating layers within my weaves. These weaves reminded my of this. I have never used silk filament. There aren’t many things that make me anxious but this seems easy to get into a mess with.
I love going to the different degree shows. They are so inspiring. There is always something new and experimental in the textiles.
Extra warp, also known as supplementary warp, is where additional warp ends are inserted and used to create a decorative pattern on top of the ground cloth.
The ground cloth is usually kept simple, such as a plain or twill weave, to enhance the extra warp. This extra warp is woven on separate shafts to the ground cloth so that it can be woven independently to create the decorative pattern without interrupting the ground cloth weave.
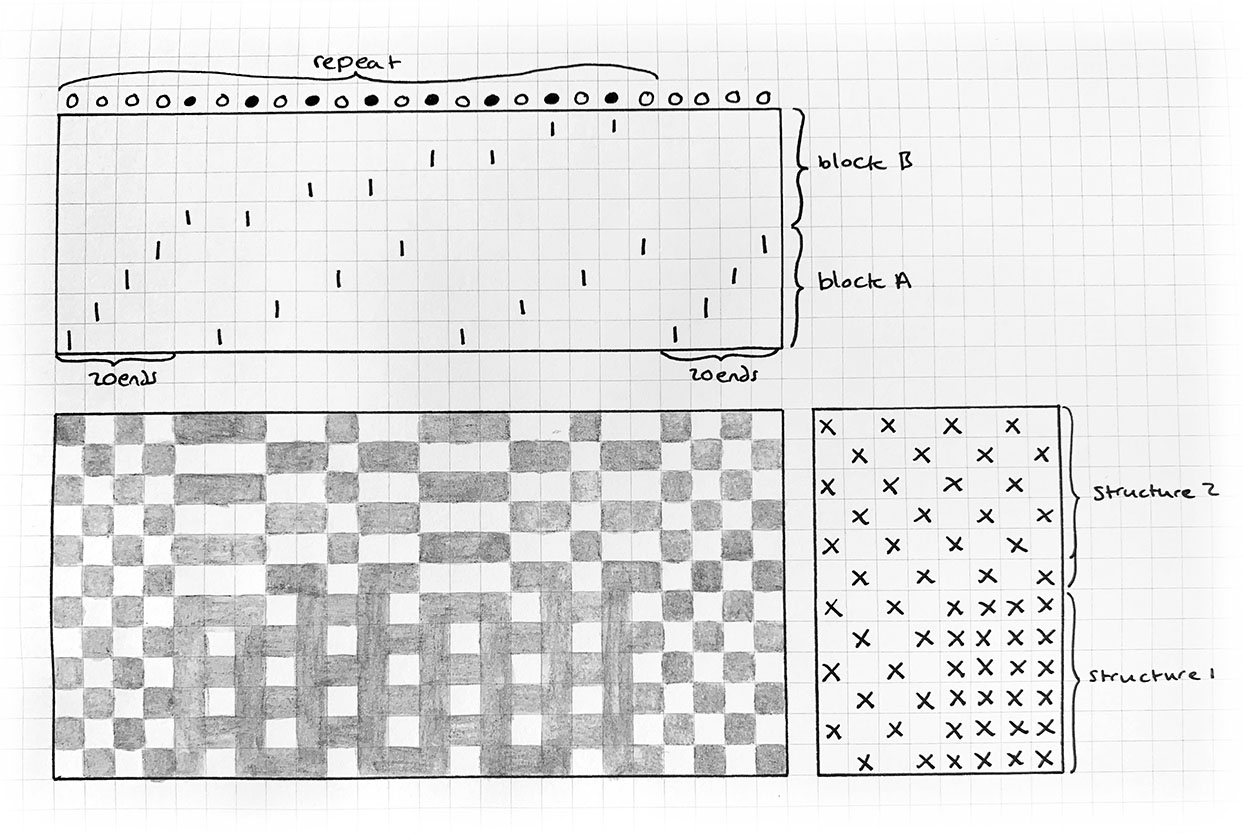
The example below shows an extra warp design using 8 shafts. Shafts 1-4 are for the ground cloth while the extra warp is on shafts 5-8. The black extra warp ends are inserted at regular intervals along the width of the warp.
The extra warp ends have been alternated with the ground cloth ends so that they do not interfere with the ground cloth weave. If the extra warp ends were all put in next to each other the ground cloth may end up having gaps.
The white ground cloth ends are put through the reed at a rate of 30 ends per inch. The extra warp threads are put in as additional threads so the warp is actually threaded at a higher density at these point. This is so the ground cloth remains consistent throughout. It needs to be able to weave a plain weave when the extra warp ends are not being woven in.
As you can see there are two woven structures above. In structure 1 the extra warp threads are floating over the surface of the cloth whereas in structure 2 the threads are woven in to the cloth. I have decided to cut the floating threads away. This will leave the black extra warp ends where they have been woven into the ground cloth creating rectangles. Structure 2 can be woven for fewer picks to create small squares or more picks to create longer rectangles.
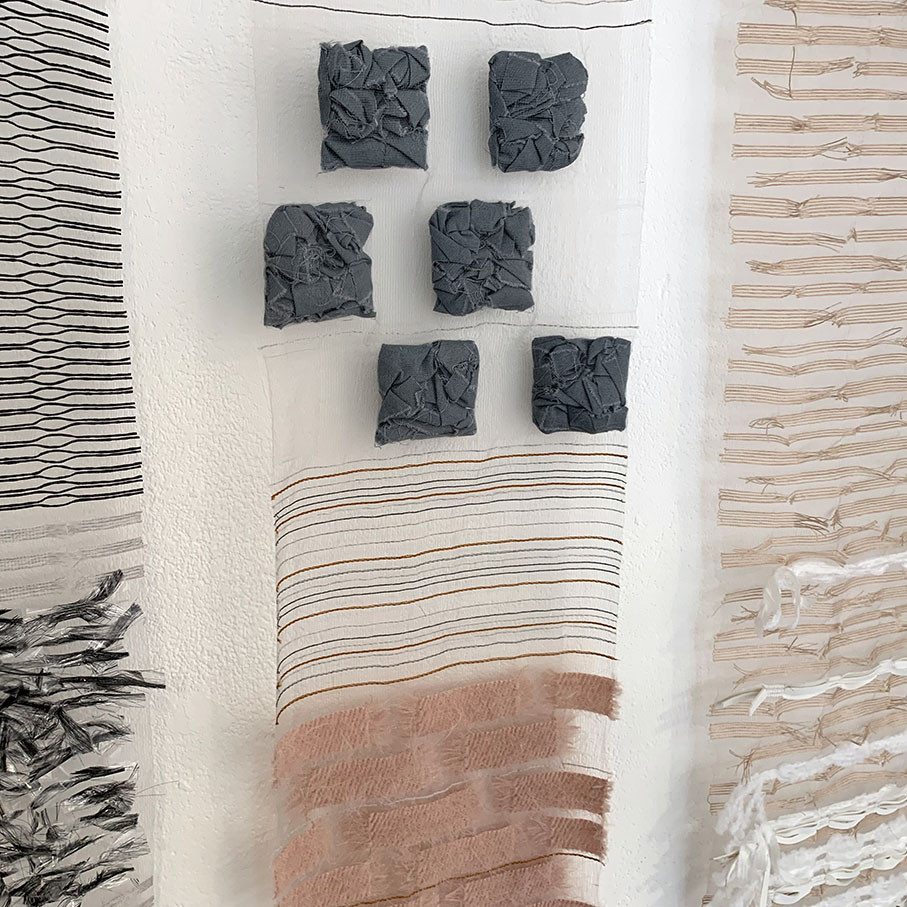
This afternoon I had a lovely time at the Soft Engineering exhibition and attending the talks at Whitchurch Silk Mill I have been to this exhibition before when it was in Winchester but this time there was the edition of Julie Hedges. The exhibition is all about how textiles can be shaped. This is one of the subjects I love to learn about and experiment with.
Being a weave technician at the University for the Creative Arts in Farnham I was very interested to learn that all of the exhibitors have at one point or another been students or employed by the same university. This is how they got to know each other and are all good friends. It was also very interesting to know that even though they are established makers they still get together to talk about and show each other their work. Being able to bounce ideas off each other seems a very important way for them to develop their ideas. I think sometimes it’s easy to forget that even professionals are still learning, can be unsure about their work and need to discuss what they are doing with someone else.
Alison Ellen is a knitter who originally trained in weave. She felt that weave was too restrictive so started experimenting with knit. She is now exploring knitted garments without seams, tops in particular. I was already aware of knitting in rounds and therefore it must be possible to knit certain garments without seams but she does this in such an interesting way using shaping techniques and adding texture. She uses combinations of stitch and varies the number of stitches row by row as well as entrelac and modular knitting techniques to create curves, movement and shaping within her garments.
I have attended talks by Anne Richards before but always come away inspired and feeling like I have learnt something. Anne Richards originally studied biology and discovered her passion for weave when she started doing this in her spare time.
Now she is known for creating sculptural pieces, particularly necklaces and bracelets. She shapes her weaves mostly by using high twist yarn. High twist yarn have a very high twist count when spun giving it a lot of energy. When it is put on to a cone it settles down making it easier to weave but once it gets wet the fibres swell putting stress on the yarn causing it to shrink up.
Her three dimensional textiles exploration was inspired by an accident when she accidentally created pleats not actually being aware of how high twist yarns behave at the time. She creates her pleats by playing with warp/weft dominant weaves, S/Z twist yarn and different fibres. By using them in different combinations she can create different effects. She also discovered that if she uses silk/steel yarn she can manually insert some pleats once the fabric is woven.
Some of her designs were inspired by origami mountain and valley folds and the mobius strip. She also cuts/stitches woven fabric together to add a different dimension. She no longer weaves most of her work herself but employs highly skilled weavers to do this for her. Her samples we finished using a folded and stitched edge.
Deirdre Wood studied ceramics and then knit before discovering her love of weave. Having been inspired by the strip weavers around the world she now embraces this technique herself. She loves the strip woven cloths of west Africa, in particular the mud and ikat cloths of Mali.
Strip woven cloth is created by weaving narrow strips of fabric and stitching them together to create a bigger cloth. Cloth is traditionally made this way due to a lack of resources to be able create larger cloths. There may be no access to a large loom or the finances to buy the quantity of yarn outright before starting weaving.
Deirdre weave strips and then manipulates, twists and sews them together to create striking designs. She creates some double sided strips for when they are folded back upon themselves. Through experimentation she found that if she graduates the yarn type across the width of the strip e.g. silk to cotton or linen when she washes it the yarn shrink differently causing the strip to curve. It became very mathematical when she decided to work out how long she would need to weave the strips in order to make a full circle. She engaged the help of a computer professor to help. She adds ikat techniques in to her work which she dyes using a collapsible frame she made herself.
I went to this exhibition mostly knowing what to expect but learnt about a new technique I have never heard of, ply-split braiding. Ply-split braiding is essentially where you start off with number of cords which you then commence to thread though the middle of each other.
Her interest in this techniques was first sparked when she when to an exhibition at the University for the Creative Arts, Farnham in 1989 displaying some of the historic fabrics they hold in their collection. She further learnt about it when she worked at the university and staffed a workshop with Peter Collingwood who was the first westerner to research ply-split braiding in depth.
During a trip to Rajasthan she became inspired by the camel girths which are made from camel hair using ply-split braiding techniques. Julie likes using four ply linen or cotton cords for her work, She then uses a grip fid (traditionally used for rope splicing) topull the cords through the middle of each other so that two of the plies are over and two under the cord. Julie often makes her own cords and explores thickness and stiffness to develop her structures, often combining variations.
There are a number of techniques to create different effects: ply-split darning, single course oblique twining and two layered oblique twining. She quickly realised that she could create 3D shapes which naturally lend themselves to jewellery. Natural structures provide some inspiration but mostly her next piece is inspired by a previous.
Once you have decided on a project you may want to work out how much yarn you are going to need. This may be so you can buy or dye the correct amount without vastly over or under estimating.
The following will take you through the calculation to work out how much weft yarn will be needed. It looks like a lot but they should be relatively straight forward things to work out. For the sake of simplicity I will work in centimetres/meters but the same can be applied to inches/yards.
The calculaion is as follows:
Total number of picks x total width of fabric (m) = amount of yarn needed (m)
How to work out the total number of picks
PPC (picks per cm) x (length of woven piece (cm) + shrinkage/take-up (cm)) = Total number of picks
The picks per cm is usually determined by sampling but if it has no been woven before see CALCULATING A SETT and use the same as the epc.
The shrinkage/take-up is usually assumed to be 10% of the width of the woven piece but this can vary by a large amount depending on the yarn, structure and finishing. Sampling will give you a more accurate number.
How to work out the total width of the warp
width of woven piece (m)+ shrinkage/take-up (m) = Total widthof warp (m)
The shrinkage/take-up is usually assumed to be 10% of the width of the woven piece but this can vary by a large amount depending on the yarn, structure and finishing. Sampling will give you a more accurate number.
It is often easier to work out the calculations in cm and then convert to m by dividing by 100 at the end.